![]()
Building the Angel Interceptor from Gerry Anderson's Captain Scarlet
|
|||
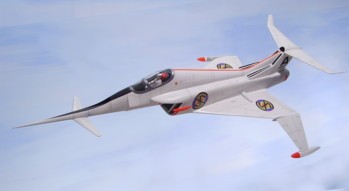
| Spectrum's high-speed jet fighters, the Angel Interceptors, are a prime example of this new look. Cut-down the nose, attach a few missile launchers and add a bit more detail and you would almost expect to see them flying at a modern day airshow - or appearing in New Captain Scarlet! | |||
 |
|||
 |
The Build .................... by David Sisson I first started modelmaking by assembling Airfix plastic kits of various aircraft, most commonly older piston-engined planes from World War Two, and I built an awful lot of them - especially Spitfires. Surprisingly then this is really the first proper aircraft model that I've built since I moved into Sci-Fi and that must be over 30 years ago - blimey how time flies! Generally speaking I
always prefer to draw up my own blueprints and I try to
build to studio size, however a friend gave me a rather
decent looking set of drawings and as there are no kit
parts on the model I felt free to pick a size. Taking the
plans to work I enlarged them to a variety of sizes on a
photocopier and decided that a 30-inch replica would look
rather nice - as it often does, as that size is big but
not too big to cause problems. Also at that length it
appears to be 1/24th scale so it has the added advantage
of allowing the use of modified kit parts, namely an
Airfix Harrier pilot and other such cockpit details. The next stage was
deciding how I should build the model. This bit always
gives your Brain a workout as you have to reverse
engineer the finished item into a set of workable parts -
essentially creating your own model kit. There is of
course no one answer to this problem, it all depends on
your own expertise and more so on the techniques you are
going to be using to produce the parts. |
|
As the fuselage was
rather flat sided compared to the designs I usually work
on, and the wings were also rather thin, I decided to use
MDF for my master patterns. The two main wings were cut out as a single piece from another sheet of MDF. The basic aerofoil cross-sectional shape was again quickly created on the beltsander, then carefully finished off by hand. The tail section was blocked out using two pieces of MDF and completed with car filler. Although it looks to be rather flat and angular the sides are actually curved out so only the front facing was set to the correct width and then the rest was later sanded away to the desired shape. A section was now cut from the main fuselage to accept the wing and the two bonded together with plenty of glue and filler. To try and keep things straight and level I decided to build the pilots cabin area using vertical laid sheets of MDF, which were sandwiched together with a thin central sheet so I could keep track of where the middle was during the sanding process. The join lines between layers also allow you to more easily see how well the sides are matching up shape wise. Once the cabin area was deemed correct(ish) I could attach it to the rest of the fuselage. To do that a section was removed from the hull so the pieces could interlock, then after some adjustments when I was sure that they were finally set straight and level all the gaps could be filled up. The area behind the pilot's section was now formed using Balsa wood, glued into place and blended in with car filler. With the basic shape now created I spent a while refining the contours and double-checking all my measurements. The cockpit area was repeatedly drawn onto the pattern to check its overall appearance and this indicated that the section was a bit too fat which led to further alterations. When I was finally happy with the look of the master it was coated in SP113 epoxy resin, to seal the wood, and then rubbed down with wet & dry paper between coats of spray-filler primer paint. The tail section was left off, as it would be cast up separately. The wood was again smoothed off with resin and the central bulge added, using a Plasticard core to define the outline shape and then car filler to match it up to the rest of the fuselage. Other parts to be cast separately included the long thin nose, the big tail fin, small front wing and the two downward angling fins to the landing skids. All the parts were cast up in a mixture of resin, fibreglass matting and car filler from plaster of Paris moulds, which did cause a slight problem with undercuts. As a result on the separate wing sections only the upper surface was correctly formed on the master patterns, with the lower sides being sanded to there correct shape on the final fibreglass castings. The main fuselage and wing was cast in right and left halves, with the angle of the wing meaning that the plaster had to be removed in a backwards direction, which caused a problem around the front air intake area and the loss of a small part of the mould. The resulting gap was fixed later in the build. The thin nosecone was cast in one-piece, with a brass rod embedded down the centre to give the casting some strength. This appears to have been done on the original studio models, as there is a picture of an Angel jet with a small piece of the nose missing and exposing what appears to be such a rod. So far I've accidentally bashed the nose into two walls and it's still fine but with a delicate model design like this I feel that it's only a matter of time before I break it! With all the main parts made it was now a fairly simple case of assembling them all. Then the model was spray painted in primer to show up any defects which could then be fixed.. Glue, filler and internal metal rods were used to attach the two down-angling wing struts to the main wings. Although they are quite solidly made I'm still somewhat concerned about the strength of these thin parts. The shallow angle of the struts will undoubtedly stress the parts under the weight of the model and possible cause problems over the long term. As I don't want to find them bending in a year's time I plan to hang the model and not leave it sitting on a shelf for any great length of time. As originally planned the pilot was made by modifying a 1/24th scale Airfix Harrier figure, but I also used other bits including the seat, which had to be cut up into a number of parts. The 'glass' canopy, and frame surround, were simply heat-formed over a separately cast section of the fuselage but when I tried to fix the parts into position I realised that the crest of the bubble was in the wrong place, it was too far back, and so I had to scrap the bits and start again with a new pattern for the canopy. |
|
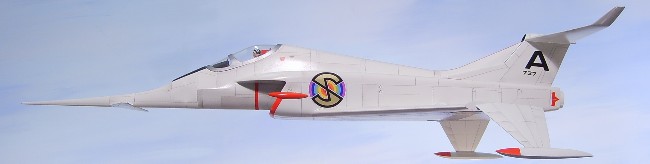
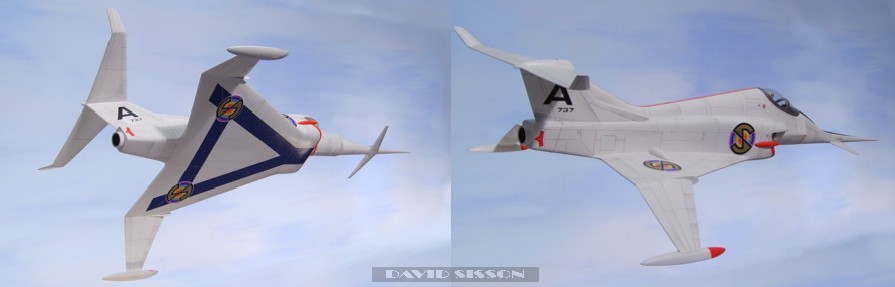
The rear skids were carved from hardwood, which were again coated in resin to get a tough hard finish, then fixed into place with metal pins. The front landing skid was made from a lump of shaped car filler. To give it some initial shape the filler was pushed into a plastic missile kit part while it set, then removed and sanded to its final appearance. The leg support is made from two pieces of Brass rod and a section of curved plastic. It is simply plugged into a small hole in the bottom of the model and can be removed easily - a small piece of adhesive tape wrapped around the top provides a snug fit with enough tension to hold the part in place. The model was painted using motorcar spray cans and then the next job was to draw all the panel lines onto the pristine surface - and this is where you find out how good your work is. Do all the panel lines actually meet up in the proper places? Do they intersect the major parts and also the Spectrum roundel's at the correct points? Even with all the effort I put in I'm always pleasantly surprised when they do! The Spectrum markings were the final bits to be fixed into place. As with previous models I printed mine off onto thin photopaper, then had to mask off and spray paint the gold centres. Personally I do get the feeling that the roundal's are a bit over-sized on this aircraft, especially on the sides of the fuselage. Unfortunately I believe that the original waterslide decals, made for the TV series, were only done in three sizes and then used on all the models and puppet outfits. So there weren't many options for the studio modelmakers to pick from. The large Blue 'A' on the bottom of the model was carefully painted on using plenty of masking tape, I didn't want to mess up the model at this late stage, then two more Spectrum roundel's added over the top. Some people chose not to add these as there is a profile photograph showing an Angel model without them - but then again there are also profile pictures of a Spectrum Patrol Car without any. The well known SPV pictures have missing tape on the front bumper, a UFO has a missing fin and the Lunar Module has a melted hole in the bottom! The trouble with profile pictures is that you never know at what point in production they were taken or the history of the model on view. There's also the chance that the one without the roundel's was the small Angel model, but I can't remember ever seeing this when viewing the show - I will keep an eye out for it the next time I watch an episode. For the
paint scheme I used Halfords Peugeot Bianca White,
Vauxhall Cosmos Blue and Volkswagen Mars Red. |
|
Finally the model was gently weathered using masking tapes and black powder paint, to highlight the various panels and break up the bland White finish. |
 |