![]()
Scratchbuilding Battlehawk from Gerry Anderson & Christopher Burr's Terrahawks
|
|||
|
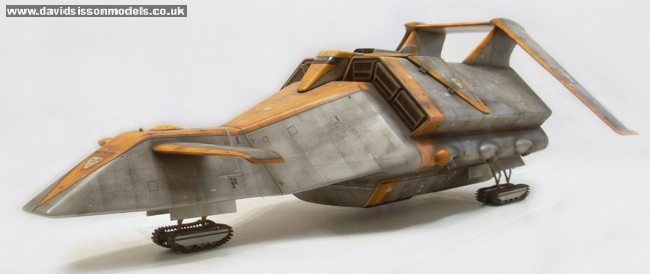
| I had made a decent model of the Battlehawk many years ago but I really wanted to build a copy of the big (almost 40") SFX model and luckily I came across some copies of the original studio blueprints. Unfortunately the blueprint wasn't an exact representation of the finished model but it did give me something to work on, and using plenty of profile photographs I was able to adjust the drawing to the correct shape. |
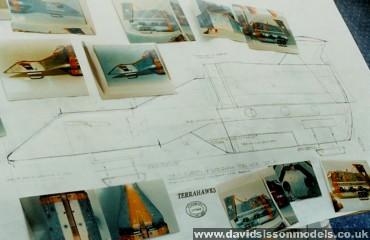 |
See Battlehawk in Terrahawks Behind-the-Scenes The Build |
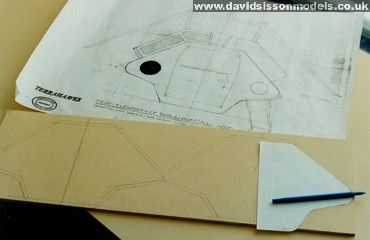 |
| The main body of the
model was going to be made in fibreglass. To do this I
decided to produce the master pattern in two parts, the
large rear 2/3rds would be one piece and then the thin
front section would be another. To make this big
flat-sided pattern I went out and bought a large sheet of
6mm MDF board, transferred my measurements to it and cut
out all the parts with a Stanley knife. I needed to glue all these parts together quickly and I didn't want to stand there for ages while the adhesive dried. Having just seen a photo of the original Star Wars Imperial Cruiser being hot-glued together I decided to go out and buy one - and as a result was able to stick it all together in double quick time. Some areas of the master couldn't be formed from MDF, including three big areas - the upper hull that twists and reduces down to the front section, the round area below (that houses the Battletank) and the rear end. These parts were roughly formed in wood and then skimmed over with P38 car filler. Fastglass resin was added to the filler to make it easier to work with. The filler was added in stages, building it up to the required shape. Very coarse aluminium oxide abrasive paper was used to remove the larger unwanted pieces before final sanding with wet & dry paper. The edges were rounded off using my belt sander and sanding sealer applied to obtain a smooth finish. |
|
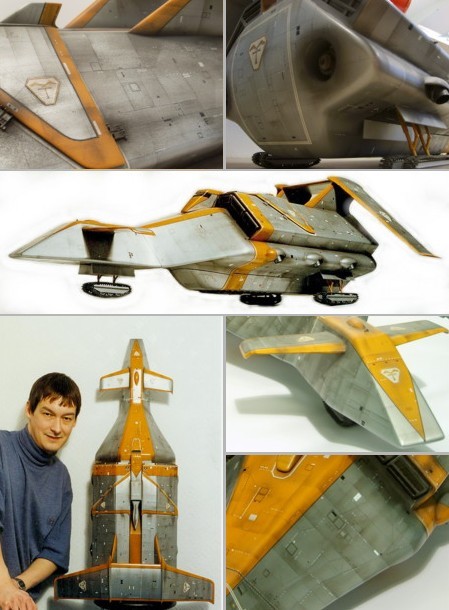
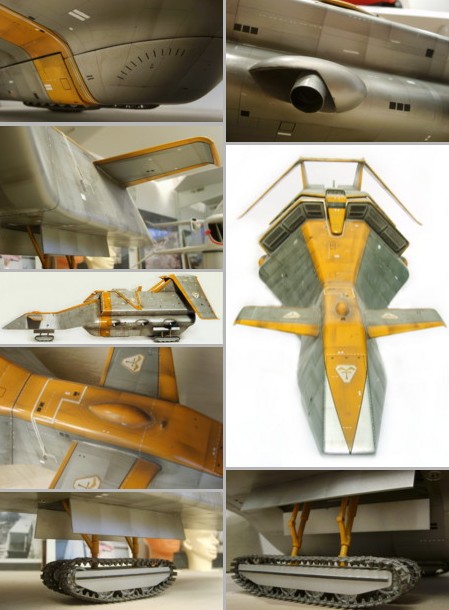
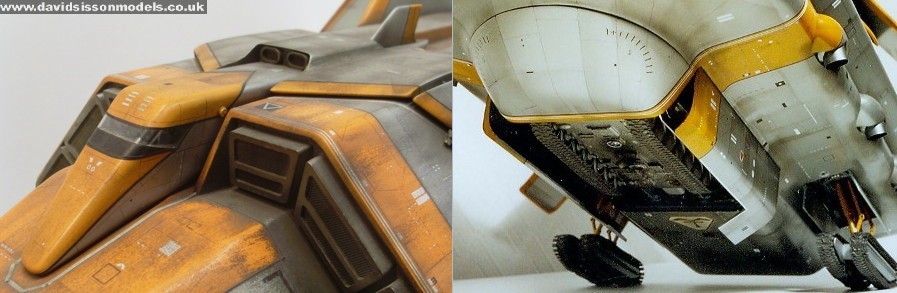
Right; The flat-sided panels were strengthened on the inside to prevent them from bending. *These materials are not good for your health - if you ever use them always remember to wear a decent facemask and try to do any major sanding jobs outside. The two masters were sprayed with paint to see if any faults showed up and then I could proceed to make my plaster moulds. I decided to make the nose section as a one-piece casting and do the main body in three pieces - two halves (left & right) and the third for the tank bay doors. I 'split' the master by first drawing the dividing lines in position then running electrical tape along them. When I apply the plaster the tape lines show up clearly and then transfer over to the fibreglass castings.. The plaster moulds are left to fully dry out then sealed with paint. The moulding materials all come from my local Halfords car shop. The first layer to go in is a mixture of P38 filler and resin to give me a smooth surface finish, then this is backed up with more resin and glass matting. I managed to cast the three main body pieces quite thinly - for once! I have been known to do some really thick fibreglass shells in the past but due to the size of this model I made an attempt to keep the weight down. The three doors for the Battletank bay were cast as a single-piece and cut up with a fine craft saw. The hull parts were super-glued together and a small amount of resin and glass matting added to the inside join to strengthen it up. The biggest problem here was attaching the front section and making sure it was both level and pointing directly forwards - that took a couple of attempts. The large engine areas were now added, and as the MDF had proved to be a decent modelling material for the master I decided to use it again here. My first thought was to use Perspex - but the finished model is covered in drawn on panel lines and transfer lettering and my previous experience told me that the pressure of the ballpoint can buckle the paint and cause it to lift, or more easily chip, off the Perspex surface. So the MDF was used, sanded to shape and coated in Ripmax SP113 epoxy coating resin. This was then sanded down to give a nice smooth, tough finish. The fronts of these engine sections are open with air intakes recessed inside. My first plan was to cut away some of the MDF to create a thin edge but I made a mistake and so ended up forming the lip with filler. The recessed area in the centre, for the Terrahawk, was formed by drilling out the hull section and then gluing the piece in a sunken position with more filler around the edge to blend it in. The rear engine area comprised of 4mm Perspex end-plates with corrugated Plasticard behind them. The two main drive engines were drilled out but the big cargo door was not. The original model featured front and rear loading doors but they were only featured once (on the standard model) during the series and it wasn't worth the effort to replicate them. All the wings were fabricated from MDF and shaped on my beltsander. The ends had a series of V-shaped grooves cut into them to allow the tips to be bent over and glued to shape, then more filler smoothed out the surface. All the wings were then secured using screws or metal anchor points embedded into the fibreglass hull. The doomed housings for the side thrusters were going to be heat-formed in plastic but I feared that they would be a bit fragile and get knocked off the model, so I ended up casting them in a thin layer of P38 filler. The undercarriage openings were now drilled out - as I decided that the model would look better displayed with the landing gear down. As this model is quite large it needed a strong undercarriage, so I had to fabricate all the parts from Brass. I used Carrs 188 solid solder and solder paint and a Supercub mini blow torch from a model railway shop.The actual wheels and tracks were identified as coming from the Tamiya 1/35 scale Sherman tank kit - three kits were required at a cost of £45. The brass leg supports were embedded into thick blocks of Perspex which were then screwed into the hull. |
|
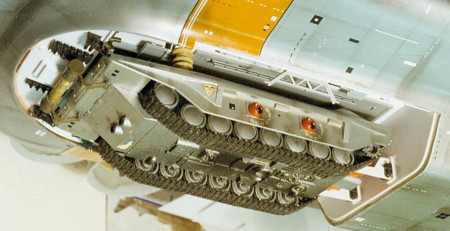
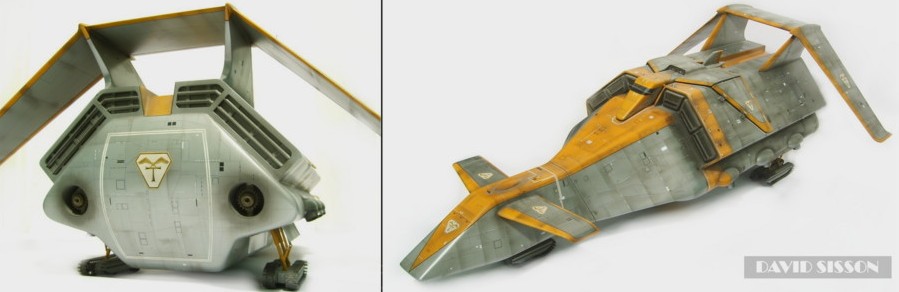
One of the reasons
for making the Battlehawk exactly the same size as the
studio model was that I had built an in-scale Battletank
in 1985 and had been keeping it for many years to put
inside this model - I would have been somewhat annoyed if
it hadn't fitted inside after all this time! |
The tank is held in position by a Brass swiveling support at the front, which is locked into place by a removable pin. The three bay doors were carefully cut and adjusted to fit in position and attached using thin strips of card which can act as hinges. Small powerful magnets were super-glued around the bay and onto the doors so that I can open and close the bay with ease. |
|
The Battlehawk is
actually three models in one. There's the basic hull
which is the actual Battlehawk, then the Battletank which
sits in its belly and also the Terrahawk, a detachable
piggy-back aircraft, that sits on top and holds the
pilots. The model was painted up using cellulose motorcar spray paints, Silver Fox and Signal Orange being the basic colours. Steven Woodcock, Terrahawks Modelmaker - 'The silver paint was in a large 2 or 3 litre tin. All the paints we used were, and were of the kind that was sprayed through an air-gun in a spray booth. We hardly, if ever, used car spray cans bought off the shelf except on small models where it wasn't worth dirtying the spray gun then having to clean it, which was always a pain. So the colour would just have been a straight mid-silver bought off the shelf from a cellulose paint suppliers.' The Terrahawk models are all covered in Letraset rubdown transfer lettering and Letraline tapes. On this large model it took an awful lot of transfers but luckily I found a shop selling some sheets off cheap. The rear wings had to be detailed up before they could be attached due to poor access around the rear areas caused by the design. All the panel lines were drawn on with black biro - there are no etched in lines. Final details included the application of decals from the Airfix 1/24 scale Harrier kit and some homemade Terrahawk logos. The silver colour proved to be slightly lighter than the original studio model, so I've applied a lot more weathering to the model in the last few years to tone it down. |
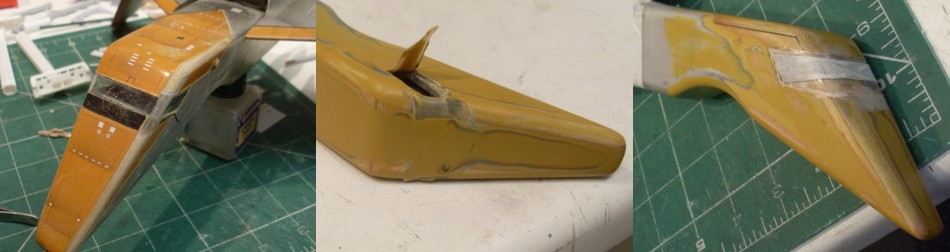 |
Unfortunately you don't always do
things right the first time. Although I liked the
finished model it simply wasn't quite right, so 17 years
later I decided to go back in and fix the two faults that
bugged me. First up was the shape of the Terrahawk's
nose/crew cabin. Although basically a simple flat-sided
design I just hadn't rounded off the various edges by the
correct amount, resulting in a more angular look. Also by
rounding off the underneath a little more I could get the
Terrahawk to sit precisely in it's recess and get rid of
the small gap where the tip of the nose rests on the
Battlehawk's hull. |
 |
| Pictures here show 1997 (examples above) and revised 2015 views (below). |
 |
| Kit
parts around the Terrahawk wings are from the Sherman
tank kit; the Terrahawk itself is secured with an
internal screw accessed through the tank bay. The six
intake vents were formed from Plasticard and fine metal
mesh - I'm not too sure about the mesh being accurate but
it looks better than blank plain plastic! Picture below; the revised Terrahawk nose section. |
 |
 |
Scratchbuilding Battlehawk; Text and photographs copyright David Sisson 2005, revised 2016