![]()
'The Martian Experience' - Filming the Future in Super-8mm
|
Over the years people have often asked me what my
favourite Science Fiction film is and I have replied with
various answers, 'Forbidden Planet', 'Star
Wars', 'Moon Zero Two', and just recently 'Serenity'. But in truth no existing film, or TV show, is really perfect for me. Some have great models and effects but lack good characters or stories. Several have good characters but the environment isn't ideal, while others are too funny or have no laughs at all. So my favourite film hasn't really been made yet, and I've come to the sad conclusion that the only person that can make my perfect film...... is me! So one day, many years ago, I attempted to make my very own feature film - unfortunately it didn't quite work out to plan. |
| I began around 1980 and eventually stopped in 1985,
mainly because the camera had broken down. In the end I
had around 15-20 minutes of usable film and considerably
more totally unusable film. Unfortunately the approximate
running time of the whole story had grown to nearly an
hour, so there was still rather a lot missing. What I did
have was a lot of SFX shots that don't, to the casual
viewer, make a great deal of sense. Out of finished
footage only three sections held together in a
recognisable form. The opening sequence where a spaceship
approach’s Mars and a crew member is killed by a
monster, a later portion from the middle of the story
where the 'hero' investigates the crashed wreck of the
spaceship, and then a tank battle in the alternate
ending. The equipment I used was a semi-decent Super-8mm camera, which was a Sankyo Sound XL-620 Supertronic with a lot of buttons on the side. This gave me several important abilities; to manually control the light exposure, single frame photography for animation, 4-second lap dissolve multiple exposure, slow-motion, and sound recording - not that I ever got that far! I also had two tripods and a couple of movie lights. The 'studio' would mostly be the small loft space in my parent’s house, or the garage for live-action and the big explosions, as my Dad didn't want me setting fire to the house! Looking back at it now the chances of me actually finishing the film were at best ZERO. Filmed over a number of years the script naturally kept changing as new ideas came to me, whole new sequences were being added whilst already completed shots were being dumped as no longer required. Overall the length of the story was growing faster than I was producing actual finished film, so the end was actually getting further away. Overall though it wasn't a total disaster, or waste of money, because it was an excuse to design and build my own models, set off explosions, make spacesuits, crash spaceships, and just have fun playing at being a 'Special Effects Man'. |
| Models - The first major model build of the film was the spacecraft 'Olympus'; the front section is a scout craft that can detach for landing on the planet. The complete vehicle was built as a 15-inch model (right), then a larger 20-inch model of just the scout craft, plus a large section of the main body for a close-up shot. Main construction was Plasticard and model kit parts (often the Airfix Lunar Module or bits of Eagle Transporter) - plus two ping-pong balls for fuel tanks. Solar panels were black paint on white plastic, that was then scored with a knife to create the effect of separate sections. Design of the scout craft was kept to flat panels to make it easier to replicate at a larger scale. Unfortunately the rather nice large model (the best model that I had ever made at that point) was destroyed during filming - several times! | 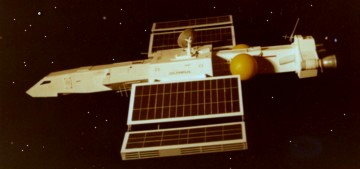 |
 |
|
Click Here for YouTube - Film 1 : Crash Landing on Mars |
| Second Attempt - A Higher
Quality of Failure! After piecing this
masterpiece together I realised that the story was not
going to work and reluctantly had to scrap it all - so
back to the drawing board. |
 |
| New film means new spaceship. This one was called the 'Argo' and was a cargo transporter. Again flat-sided construction because I would need to build the bigger crashed version, plastic sheeting over a balsa wood shape, kit parts for detailing and an eggcup for a main engine! The ship was designed with the edges hanging down, like an upside down U-shape - but you could not see this unless you looked from the rear, and as a result it just looks rather plain and fat from the side!! |
|
First up were the shots of the spaceship 'Argo', and
here I decided to experiment. For a shot of the ship
flying towards Mars I decided to create Mars by
projecting a slide of the planet onto white card, then
also project the moving ship using my Super-8 projector,
whilst filming it all with my camera panning across the
screen which would get away from having a locked-off shot
- and it almost worked! Mars looked great, the projected image looked far better than the flat-lit artwork and photograph that I had used before, but the image of the spaceship had terrible contrast and didn't match any other shot I had done. So this effect was scrapped. |
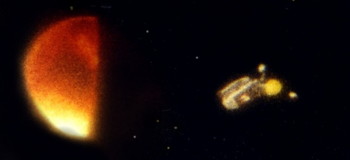
| Next I decided to re-film it using a multiple
exposure of the projected Mars and an optical zoom on the
ship miniature, however again I decided to experiment. As
the light bulbs inside the engines were not very bright I
decided to try and boost them by doing an extra pass -
just like I had read about in 'Cinefex' magazine, where
the weak lights in models (such as the starship
Enterprise) were filmed on a separate pass, at a
different exposure, to help burn them into the film. So I
decided to try this and spent a great deal of time
setting it all up in my parent's blacked-out living room,
and again it almost worked. The extra pass of the main
engine travelled in perfect sync with the model - except
that it was a couple of inches behind the model! That's why you need Motion-Control I guess, so the shot was re-filmed yet again (above) as a simple locked off two-pass multiple exposure. The few spaceship shots that I did eventually shoot came out rather well and were probably the most perfect shots in the whole movie. This was especially true of the close-up shot of the passing spaceship. Here I ran into the common problem of keeping things at an even pace for the duration of a shot, as models or camera movements often speed up, slowed down, or just hesitated almost every time. In the end I simply slid the model across a black table top using single-frame stop-motion, with carefully marked timing points for it to pass over. This technique resulted in a consistent speed across camera for the duration of the shot. |
 |
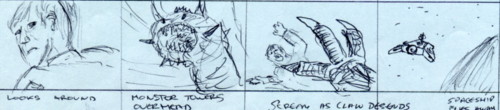
| Above: the first section of film was completely storyboarded, shot for shot, as I needed to know exactly what props and set pieces needed to be built. |
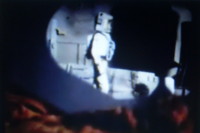
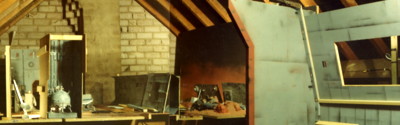
| For the live-action interior sequence, where a
crewmember is killed by the monster, I had to make a
costume and partial full-size set. The costume was a pair
of orange overalls with some badges added. A gun was
fabricated from Plasticard and kit parts, with a shampoo
bottle top for a barrel - sprayed matt black it looked
quite decent. The set was made from a series of hardwood
support frames that held up sheets of hardboard. The
whole thing bolted together and could be assembled when
required. Obviously a willing actor was required and I did not want to go down the route of using my friends, who were all the same young age as myself, and would immediately spoil any aspect of realism that I was trying to achieve. I needed an adult, an old guy - 'Dad can I borrow you for a few minutes?' |
|
|
Unfortunately even with my full-size piece of set,
built inside the garage, I quickly found out that my
'actor' walked past it all in two seconds flat, and no
matter how I framed the scene I would end up showing part
of the garage walls or the ceiling - it was a disaster! I
needed a corridor set at least four or five times bigger
than the one I had, and there was no way of building it
full-size. So I went small-scale and built a 5-foot long
model corridor that was scaled to suit my 12-inch 'Action
Man' doll, that I then dressed in a suit to match my
Dad's outfit. To film it the camera was attached to a wheeled base (made from Meccano) and pushed down the corridor to get point-of-view shots. Wide shots of the crewmember were achieved simply by grabbing the doll by the legs and gently moving it up and down slightly to make it look like it was walking (like they did in 'Captain Scarlet'), and I mixed this with extreme close-ups of my Dad's face. It all tied together quite neatly and worked rather well - helped out to a large extent by the overhead lighting, creating pools of light and shadows, that helped disguise the faults. |
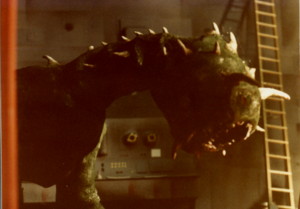
| Of course the end of this sequence features my
'Monster', which I had to design and create - and then
bring to life! This was a bit of a struggle for me and I
tried to think of how I was going to do it, with
stop-motion being an idea for a while, but in the end I
decided to go with puppetry. The design came together
quite quickly as I wanted something that had a big head
with a large open mouth and teeth, big claws, and a
spiked tail - and that's pretty much all it consisted of! To make it I just formed the shape from a product called 'Mod-Roc', which is plaster-bandage material. This bandage is dropped into a bucket of water to activate the embedded plaster-of-Paris, then placed over wet crushed up pieces of newspaper. More plaster could be added to finesse the shape, and 'Milliput' epoxy putty was used to form all the teeth and spines. To get this solid monster to move the plaster was simply knocked off around the joints to allow the bandage material to flex. This puppet was just scaled to my 'Action Man actor' so I then had to build a large sized claw (from the same material) for the single shot of it attacking my Dad. Later in production I also built a larger scale head with lights inside to make the eyes glow in the dark. This head actually fitted on to my hand like a glove, with the light switch inside that I could activate with my fingers. Because the head was only to be seen from the front I built it much flatter than the puppets head, compressing it down so that it would be easier to handle and film. After months of filming I had finally finished the beginning of my movie, there was still a great deal to do but at least it appeared to be working to plan. |
|
 |
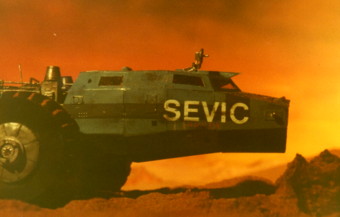
| Part 2 - Driving about on Mars At last we are on Mars, but it was here that the film began to go to pieces. As filming progressed at a very slow rate I began to realise that yet again it was growing into an epic that I couldn't possible complete. As a result the script began to change on a weekly basis, undergoing a great many alterations, and then several major changes towards the end as desperation and boredom took over. To begin with though it all seemed fine. In the story the hero drives a futuristic lorry across Mars so that was the major model to construct. Built from Plasticard, balsa wood, and selected model kit parts it came out at around 28 inches in length. The wheels on the truck were modified Meccano parts, whilst the wide ones on the trailer were cardboard tubes wrapped in plastic sheeting, with plastic strip ribbing for tread. A fair amount of effort was put into making the trailer detach and filming the two vehicles parting - yet this was all eventually scrapped and the vehicle is only ever seen as a complete unit. |
 |
| The landscape was built on a raised platform using four 8x2 foot sheets of chipboard that could be arranged as required. Small Martian rocks were formed from 'Pollyfiller' repair paste, medium sized from plaster bandage, and then the large ones from baking tinfoil (slightly crushed) over cardboard formers. Red sand came in small packets from my local model railway shops. The red sky backing always had to be over-exposed to stop it from looking like a flat painting. Design of the hauler was inspired by the big-wheeled vehicles from 'Thunderbirds', and the Y-Wing Fighter from 'Star Wars'. The long front-end design was a problem for when it went over mounds as it would dig-in to the dunes - it also wobbled greatly due to a lack of suspension. |
| A macro lens on the camera meant that I could get
really close in on the model, so there was no need to
build larger scaled sections. However I now ran into the
problem of the model being too big for my Martian set!
This landscape was fairly big yet turned out to be next
to useless with the model sat in it. The problem was that
the model needed to be three feet off the set to begin
with so that it could then enter the frame at the start,
and then it needed an additional three plus feet of
run-off room and I simply didn't have it. So the model
was always in frame to start with, then had to accelerate
and then stop before falling off the tabletop, which
meant that I hardly had any useable film from the middle
of the shot. On top of that there was also focusing
problems, the model shaking as it moved, and it looking
too big for the landscape surrounding it. Time for a
re-think. The answer was similar to the problem I had while filming my live actor, in that if you couldn't get the medium distant shots then just cut between wide and close-up action. For the wide shots I used a photo cut-out of the model truck mounted on a stand and dragged across the tabletop on a wire, which had the benefit of giving my Martian landscape far more scale. Then I shrank the tabletop down so that there was only two feet of landscape between the camera and the sky backing, switched the camera to the macro facility, and filmed the model from only a few inches away whilst pushing it with my free hand. This resulted in really nice close-up action shots as if filmed from another vehicle, and got around all the other problems to boot. |
 |
| Left: the robot co-driver, who was later promoted to be the actual driver, but never filmed. The puppet made from plastic parts was very brittle and fell to pieces, a full-scale upper torso was never completed. Centre: the drivers cabin which was being built full-scale when production ceased. Right: Dozens of shots of the vehicle without the trailer were shot and then scrapped when the script changed. The macro lens allowed me to get so close that the camera would touch the model during the shot. |
| In the (first) story the lorry delivers supplies to various research stations, and it is one of these stations that first detects the spaceship descending and alerts our hero to the possibility of a crash occurring. The driver dismisses the idea of ever finding anything out in the desert but the following day his scanner spots a broken radar mast sticking up over a far distant sand dune, and alters course to investigate. |
 |
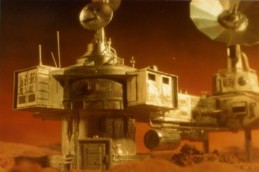
The METCOM station was
another model built from Plasticard and kit parts. This
one was mostly made from two older scratchbuilt spaceship
models that I had broken up, one of which was the main
hull of the 'Olympus' spaceship from my first film. Putting lights into models was a bit of an effort, so for a shot of an illuminated METCOM sign I resorted to filming a doctered photograph of the model instead of the physical prop itself. The area where the light panel was supposed to be was carefully cut from the photograph and then I put some translucent plastic in place, back-lite it, and then just filmed the small 6x4 inch photograph using the macro lens facility. |
 |
| CGI - 1980s cheap style. As the story unfolds the hero finds the crashed spaceship because his scanner spots the radar/communications mast sticking up behind some far sand dunes. I had realised for a while that I needed some computer screen shots for my film and I decided to do them using actual computers - which was not too clever because most proper sci-fi films to that date had usually just used traditional cel-animation - or built basic shapes out of white wires that were filmed against black backgrounds and then coloured with filters - which I should have done! To get simple screen shots of various messages appearing I just took my camera to work and filmed one of the office VDU's in my lunch time. On a blank screen I could type words, lines or blocks, and then film them live or animate them using single-frame filming. Flashing alert signs could be done by simply turning the brightness up or down!! |
| However to show the spaceship radar mast on the horizon - and then zoom in on it - was a completely different and more complex problem. To do this I resorted to 3d computer graphics - no kidding! Home computing was a bit of a rage at the time although for all the talk about learning to do programming most people just seemed to play games on them. I had just bought a 48k Sinclair Spectrum computer and amongst the games was a 3d image program. This program was terrible because you created it by drawing layers which built up into the final image - however the drawback being that you didn't actually know what the final image would look like until you had finished it - and even worse the computer gave no warning sign of when it was getting to the point of crashing!! I had to draw this complicated 3d image four times before the computer finally managed to show it without breaking down under the strain, and then it took another two hours to film the ten-second effect. But I have to say that the final shot looked impressive at the time. | 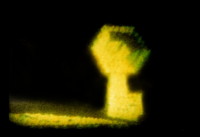 |
| After spotting the ship the hero drives over to
investigate, meaning that I had to build the ship to a
larger scale, again from plastic and wood although this
time it was only a partial half model. The biggest
problem here was going to be getting the hero to walk
from the truck and into the wrecked vessel. My plan was
to copy what I had done for the first part of the film,
using a live actor for close-ups on partial sets and a
small Action Man doll, dressed in an identical outfit,
for all other shots requiring bigger environments. But
only the actor could walk and I couldn't film him. My
first idea was to use stop-motion and did a test with the
12-inch spaceman figure with reasonable results. But an
Action Man doll is not really a viable figure for
animating because it is not very good at holding a set
pose. When you animate a figure walking it has to often
stand on one leg during the shot, and that means that all
the joints must move freely yet have the ability to be
frozen in place - plus you need to be able to secure the
standing foot to the tabletop. The other major problem
is that you do need a bit of skill to animate anything in
stop-motion, it is a simple technique but it is not
simple to work out the timings, and get things to move
correctly. After my test I decided that my skills, and
the doll, were only really up to just animating the arms
and head for some brief scenes, certainly not walking -
so another technique was needed. The answer was in one of
my many special effects magazines where instead of
animating a single object that could change slightly over
the course of 24-frames you instead use 24 slightly
different objects that appear to be the same thing -
basically like a cartoon but in real life. |
| When these photographs were printed I could then carefully cut out each picture of the spaceman and stick them onto stands, numbered in sequence. The landscape set was then built and the first cut-out placed in the centre and two frames of cinefilm were shot, then that cut-out was replaced with the next which was placed a few millimetres further on and two more frames exposed. This continued until I had used all the cut-outs, at which point I then went back to number 1 and used them all again, and again. The result was really rather good and I was quite pleased with myself, as my spaceman figure now appeared to walk quite convincingly through the frame. |
|
| There were of course a few faults. Firstly because I
had used two frames of film the image seemed to flicker
more than normal, but that is always the drawback of
stop-motion. I could have improved it by using single
frames but that would have meant twice as many
photographs, and I wasn't going to redo it all. So I
decided to shoot some more scenes using the photo
cut-outs but this time added some scenery between the
camera and the figure to partly obscure it, and then also
added a camera pan - both of which helped to disguise the
effect. The second problem was that there was a bigger difference between the last and first photographs than all the rest, which created a slight jump. However this just made the spaceman look like he had a bit of a limp, which I thought was rather neat and liked the look of it. |
 |
| The partial larger scale spaceship model. The camera was always kept as low as possible to make the models look bigger, and I was often having to adjust the tripod height as the edge of the table would start to appear in the viewfinder. For one shot a small mock-up of the spacesuit helmet visor was attached to the camera lens so that I could shoot an angle from the hero's point-of-view. I had hoped that I could use it often, but it didn't look that good as it was a bit dark and out of focus. |
| 'The Martian Experience' Part 2: The Crash Site Sorry - No sound |
Click Here for YouTube Film |  |
| Part 3 - Inside the Ship Now inside the wrecked spaceship the hero investigates to see what has happened. Here I was able to use more live-action and I talked one of my colleagues at work into appearing as my 'star'. For this I had to make a full-size spacesuit costume that matched the small action doll I had been using up to this point. As I had planned this all along I had kept the design fairly simple and only used flat panels in the construction, which meant that is was very easy to duplicate. Also I had already started the full-size helmet, chest and backpacks when I built the puppet-sized version and so I was able to do the detailing on both at the same time, which helped to make sure the shapes matched up. The basic costume was simply a pair of white overalls
with added bits of cloth at the neck and wrists, coloured
stitching, and various patch's. I also added some padding
and fixed some detailed Plasticard sections to the cloth
at the wrists, so that it looked more technical. I did
this by drilling holes in sheets of thin plastic which
then allowed me to sew them securely onto the cloth, and
then I could glue more plastic pieces to those areas. The helmet was much lighter and just made from plastic
sheets. A small hand torch was built into the top to make
it look more interesting. The puppet version also needed
one too and as a result it had wires trailing out of the
back, which had to be hidden during the film shooting. |
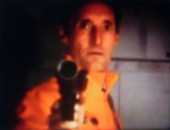
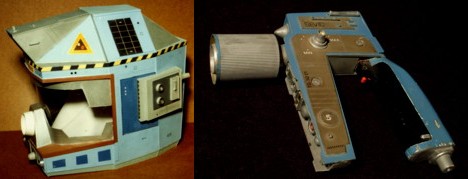
| Another gun was required and I made this my modifying
a scratchbuilt 'Space: 1999' stun gun that I had built
years earlier. This was rather a crude balsa wood item so
I clad it all up in plastic and added a lot of detailed
parts, plus another shampoo bottle cap for a barrel. This
one had to have a working light in the muzzle so that I
could add the 'scratch' laser effects at a later date.
For this a micro-switch trigger was added and the top was
raised up to encase a battery pack. The tube piece on the bottom is because the original design included a power cable feed to the gun, but I didn't bother with it during filming. |
 |
|
Left: All the live-action scenes were shot on one cold winters evening. My friend from work, Martin Storey, wore the spacesuit. He wandered around our small garage as I tried to direct him and explain what he was supposed to be doing, and seeing. He had nothing to read because there was no script, and there were no storyboards to look at either, because the whole thing was just in my head, and only I understood what was going on and how it would all fit together. However as there was no sound recording I could just talk him through the scenes and get the shots I required. |
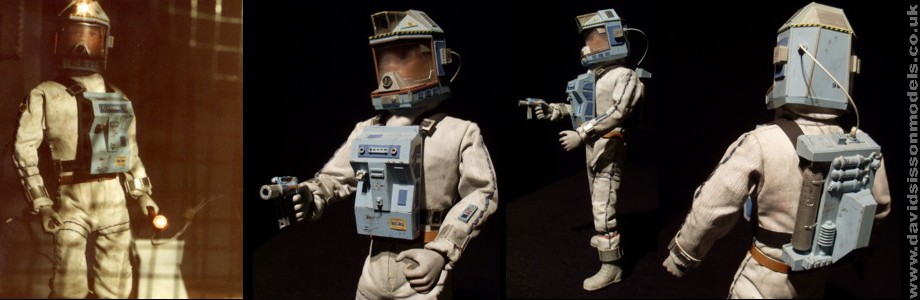 |
| The Action Man doll came with a silver jumpsuit which I just painted white, then added the stitching and plastic parts. The standard boots and flesh coloured hands were given a thin wash of grey - everything done with Humbrol enamel paints. I had to cut the top of his head off to install the light in the helmet. Above left: Electrical wires can be seen trailing from the figure and also the lamp in his hand, a problem that I had to shoot around. The lamp was just a 1.5-volt bulb encased in modelling clay. |
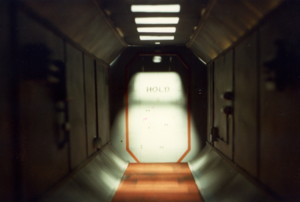
| As before I was struggling to shoot my actor against
my tiny set but this time I was helped by the interior of
the ship being so dark. Because of this I was then able
to set up various parts of the set on my driveway, and
shoot more scenes outdoors as night fell. As only the set
pieces were lit you naturally assume that the rest of the
set was in darkness, when in fact there was actually
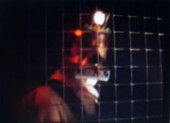
nothing there! Of course this could only work on certain shots and the script still called for numerous sets such as the cargo hold, with cages, and the control room with mutilated corpse! All of that was done with miniatures and was constantly inter-cut with the live-action shots. The 5-foot model corridor came into use again and this could easily be filled with broken pipes and wires to look like a complete mess, then I could cut to shots of my actor with just a few bits of wire hanging in front of the camera and you still thought that he was in the bigger looking set. I also gave the actor a torch that he could constantly wave around and then used it myself to illuminate the models sets, and this effect helped to tie the various different shots together. The hero enters
the cargo hold and walks past rows of cages, here he was
supposed to see dead creatures and then find one cage
ripped open, but I never did shot those scenes. The hold
was just a model set, with the only live-action set piece
being a simple single piece of wire mesh that I filmed
through. |
|
The monster now wakes up and makes its grand
appearance by smashing through a wall, and then tries to
eat the spaceman. For this shot I turned the set on its
side and filmed upwards so that all the wall pieces, and
debris, flew straight down at the camera, making it seem
a much more violent action. My hero now grabs his gun
and blasts away which gave me another big technical
problem of what should happen with the gun? |
| I then went for a locked-off shot of the gun firing and double-exposed a laser beam coming out of the barrel, and a similar shot of it then hitting the monster. The beam was simply a slit in a piece of black card with a light and a coloured filter behind, by uncovering the slit with another piece of black card the beam appears to come out of the gun. |
|
| However when this trick was reversed onto the monster
(far right) it looked rather lame and it needed something
more adding, like sparks flying off at the impact point.
That was done by changing the card from black to white so
that I could then project the sparks on from a slide
projector placed next to the camera - so laser light from
the rear and sparks from the front, and all shot in the
dark so nothing shows. Easy! Both techniques had there plus and minus points. The scratch effect looked poorer but could be added at any point when the actor chose to fire, so was more natural. The double-exposed effect looked great but was static - plus no one was actually holding the gun, which is a slight flaw!! |
| 'The Martian Experience' Part 3: Hunter or Prey Sorry - No sound |
Click Here for YouTube Film |  |
| The monster is dead - but the silly thing wasn't supposed to be! In my story the monster is wounded and gives chase to our hero, who goes back to his truck where he, and his robot pal, have to figure out a way to kill the massive armoured brute. But again I realised that there was just too much filming still to do and that I probably was not going to finish. Plus my monster was such a problem to photograph that it was not going to be possible to get the footage that the script called for - in fact it was so useless that it made the stuffed shark in 'Jaws' look like an award winning actor! Time for another story rewrite, and another, and another. Each new idea had to incorporate the previous footage that I had shot and shorten the projected running time. |
|
At this point Gerry Anderson's new series
'Terrahawks' had appeared on our television screens and I
was rather taken by the Overlander and the Battletank
scenes in the episode 'Close Call'. Inspired by this I
decided to dump any more of the slow-paced
'alieny-monstery' stumbling about in the dark nonsense
and go for pure hard-core model action stuff. Lets have
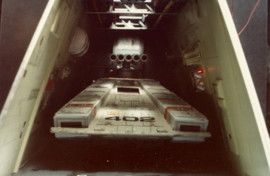
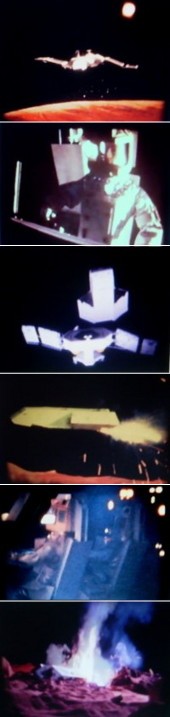
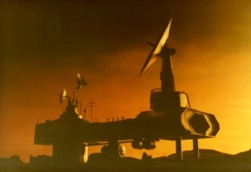
some explosions! Part 4 - Action Stations The final rewrite turns my robot pal into the actual lorry driver, and then my hero driver into a secret agent of Terran Law Enforcement. This agent is sent to Mars to investigate the ship crash and secure the secret cargo. The lorry is driven by the local undercover agent, and contains a futuristic tank for our hero to drive (yes, a bit like 'Captain Scarlet'). Of course this rewrite to shorten the film also added scenes, such as his passenger ship landing at a Mars base (see film 2), which I did actually shoot. This scene came out rather well with the space vehicle landing in a cloud of rear-lit gas. |
| The landing bay was built from plywood
as an open-sided box shape. The interior was then clad in
the usual plastic sheeting and then covered in various
model kit parts - mostly panels from the sides of some
lorry container kits, and frames from the Airfix Girder
Bridge. I incorporated a number of vertical pipes into
the design, one of which was the actual support pipe that
raised and lowered the spaceship model. Because this pipe
was only painted plain grey, without any markings on at
all, the camera could not detect when it actually moved
up and down the rear wall, even though it was in plain
sight. The spaceship was a plastic container from a garden centre, detailed again with kit parts. Most of the detail was simply drawn on with a black biro and enhanced with Letraset decals, and coloured tapes. To save time, and stop wasting money and effort, only the side facing camera was completed. The gas for the engine was feed up through the hollow support pipe and into the back of the model. |
 |
| The story now is that the monster was only part of the cargo, and that it was actually let loose to cover the deliberate crash of the spaceship. The criminals who organised this have already been to the crash site, off-loaded the precious secret cargo and are now driving off into the distance with their loot. Our hero must now jump back into his lorry, chase the villains, and stop them at all costs. A bit of excitement at long last! |
|
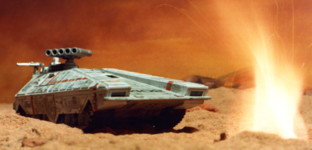
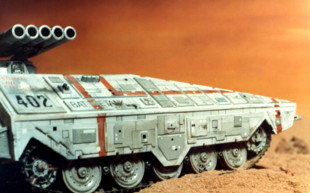
The first job was to design three new vehicles to
star in my film. First up would be the hero's Battletank
and its design would be governed by two practical
limitations. Firstly I had a 1/35th scale Tamiya tank kit from a previous Martian model build, that was fitted with two small motors to power the tracks, so that was definitely going to be the chassis for my new design. Secondly this vehicle was supposed to come out of the back of my existing lorry container, so it had to appear to conform to the shape of that model or it just wouldn't logically fit the part. As with all such fantasy vehicles the reality was that it would end up being too big to actually fit inside the lorry anyway - but you can't tell that from watching the film. However the general inward-angling trailer sides did conform to a good tank-like shape, and so the two vehicles do seem to match up well. |
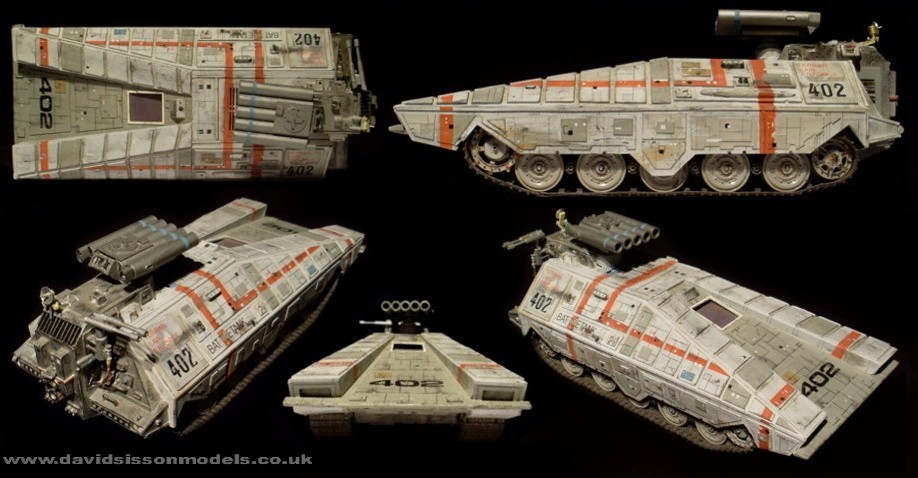 |
| The model was just made from plastic sheets and kit parts, this time forming a shell that was just loosely placed over the tank chassis. Model size 10 x 4 inches. The original plan was to incorporate a fan inside to blow air out of the bottom to create a dust trail, so vents were added to the top panel. However the small size of the model and the wires already going to the motors and lights prevented me from doing that. The missile tubes on the top were constructed to a larger scale but never filmed. |
| This new tank model turned out to be rather nice and
operated fairly well, although I'm not sure if it really
went fast enough. The biggest problem that I had with it
was simply controlling it. There were two motors inside,
one for each set of tracks allowing the model to turn,
but this was hardly used as it slowed the vehicle to a
stop. However these motors were controlled from a remote
box (containing the batteries) and this was connected to
the tank via long electrical wires. Hiding the wires from
the camera became the big problem and at times this
simply could not be done, so the batteries were placed
inside the model and it was allowed to run wild for some
shots. The Bad Guys |
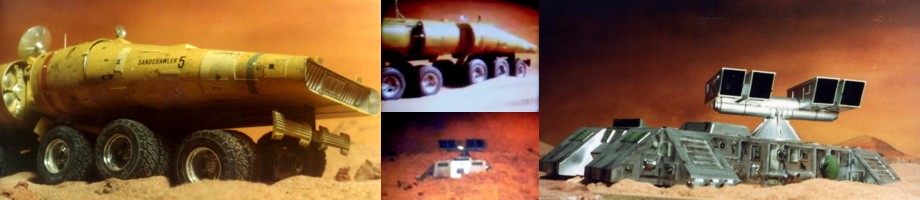 |
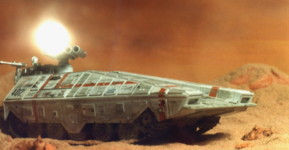
| The Sandcrawler was only built in one scale. The 24 wheels looked great as the vehicle charged over hilly terrain, giving the appearance of having a complicated six-axle suspension system - when in fact it had none at all! The actual model was only supported by the 2nd and 5th axles, and they had very little movement in them. The other four axles provided no support to the model and were only attached by thin pieces of plastic that simply flexed as the model went over the dunes. Top Right: big Robot Hover Tank model, that never hovered or moved, it was only used for close-up shots. Airfix Saturn V and Space Shuttle parts were used on the missile launcher turret. |
| The villains Sandcrawler vehicle was the
next to be built. This needed to be another big truck to
move the cargo, and as I was a big fan of the Overlander
from 'Terrahawks' then that model heavily influenced my
design plan. Not that there was a specific plan here as
the design also came about simply due to the bits that
were available from my large box of spare parts. To build various things for the film I was using a large amount of model kit parts, and so I was often visiting my local model shops to boost my supply. One shop had a special sale on and I managed to pick up some 1/25th scale lorry kits and half-a-dozen Apollo Command Modules. The later were cut in half and glued to either side of a plastic box to form most of the Sandcrawler hull, the rest being a sheet of 30-thou plastic wrapped around a support frame. All the wheels from the lorry kits were paired off and stuck to a simple chassis to create a very dynamic looking vehicle - its only drawback being that it could only go in a straight line and not actually turn!! While I did think of adding guns to the
Sandcrawler I decided that it would be better to
give them a tank too - only they would have an automated
robot-tank that hovered over the sand. Nice idea - with
just the simple drawback being that it could not actually
hover!! I have to say that by this point my models were beginning to look pretty decent, which was a pleasant surprise to me. When I began filming my modelling experience had just been assembling Airfix-type kits, and putting some occasional extra detail in. For this film I had been building things from scratch, and although they had been pretty crude to begin with they were now starting to look the business. Often my biggest fault was over-building everything and finishing complete models detailed on every side, when it was simply not required. The worst example was when I started slowly hand stitching the detail into the patches on the spacesuit - it was stupid because I could paint it on in a few minutes and the camera could not tell the difference. I guess it was just me wanting the stuff to be nice and worth keeping, when it actually just needed to be useable... and disposable. |
|
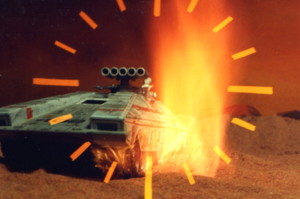
Explosions Of course if we are going to have a tank battle then we are going to need explosions of some sort, and that was my biggest problem of all. The only explosions that I had filmed so far had been for my scoutship crash-landing in the first aborted film project, and they had not been too successful. |
|
| First of all the vehicles had to fire their guns in
some way, I did originally consider using a quick blast
of gas from my airbrush but decided in the end to use a
more simple 'light' effect. For this I fitted small light
bulbs into the Battletank's rocket tube
assembly, which meant that a mass of electrical wires had
to be fed out of the bottom of the model, joining the
existing wires for the drive motors. These wires linked
to a plastic battery box with a 'keyboard' of contact
switch's on top. During filming I could tap the various
keys on the box, to create circuits, which would activate
the lights. Viewing the resulting footage I decided
that the effect, while acceptable, was not very
spectacular and something else was needed. The answer was
flashbulbs which I bought from a local camera shop. These
came as plastic cubes containing four bulbs each, so the
first job was to cut them open and extract the bulbs,
which could then be wired into the models for each shot.
The bulbs could only fit into the bigger models, so the
big Hover Tank could shoot them but not the
small Battletank. So I then started to build
just the missile section in a larger scale but it was
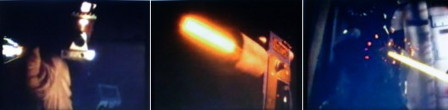
never finished. Now we get to the explosions and my first idea was again to use fireworks, especially as I still had a box full of them. However the scenes called for the explosions to go off as the vehicles went past the camera, so timing was everything! Film magazines had mentioned the use of 'Flashpaper', a combustible paper that can burn harmlessly in your hand, and that was sold by magic shops for performing tricks. So I set up my models and took a few snap shots with this flashpaper igniting (above) and the results looked OK, the trick was how to ignite it though. |
| Even at double speed shooting the explosion doesn't last long. So some shots were extended in the editing stage by cutting the shot in half , overlapping, and repeating a few frames. |
|
| After several experiments my answer was to use a
flash bulb as an igniter, so that I could trigger them
using the electrical keyboard that I was also operating
the lights from (somedays you really do need three
hands!). The flash bulb was wired up and then carefully
wrapped in flashpaper, this was sprinkled with explosive
powder removed from a firework, and then the whole thing
wrapped tightly in a tube of tinfoil. The idea is that
the bulb flash generates heat that is trapped by the
foil, which ignites the flashpaper, which in turn sets
off the explosive powder. The results were certainly
acceptable and on one early occasion the camera caught a
direct sight of the bulb flash going off, which burnt out
a couple of frames of film, and added to the visual
impact. From that point on I always tried to line up the
explosive tube, so that it pointed towards the camera
lens, to replicate that accidental effect. The explosions were reliable, controlled, and most importantly safe, so I could just shoot them indoors. Models, motors, lights and explosions, everything was going to plan and I was having a ball....... and then the camera started making funny noises, and broke - Bugger me! |
|
So I quickly sent it off for repair, but when it was
returned weeks later the viewfinder was out of alignment
and I could not focus the lens properly, so off it went
for further repairs. More weeks passed and when it
finally came back in full working order I was busy
building some replica models from the Gerry Anderson
television series 'Thunderbirds' - and have a lot of fun
doing it too. The film stalled, the camera was packed safely away, the props went into a box and I cleared the loft space to make it tidy. Then months later I realised that my movie making days were over and the film rolls were placed in another box and forgotten..... |
| ..... Until 2010 when moving some old boxes I came
across the film reels and decided to look at them. Much
of the stuff was stuck together in story order but not
properly edited, with many takes of the same shots being
repeated over and over again. There was also some extra
film reels with bits that had never been used. As a test
I projected the film against a sheet of white card and
refilmed it on my cheap Samsung digital stills camera,
with it set to its movie-mode option. The results were
passable and it was nice to have a copy to easily view on
my computer. But best of all it gave me a chance to play
with the simple editing program and actually present the
footage in an almost finished state. The plan was to just
put the first part on YouTube, where my Dad is killed by
the monster, as that was just a straightforward copy of
the finished film. Then I decided to chop up the next bit and stick it into order with a few captions. I was starting to enjoy myself now and realised that I could tweak the next section where the hero meets the monster. In the cinefilm nothing much happens and there is no ending. Now just with some editing he does meet the monster, kills it, and then leaves. All of which I assembled from bits of film found in a box! Luckily there was a quick panning shot of my studio tabletop, on an out-take, which shows the spaceman doll and then the monster puppet lying on is side, which I've now used to show the monster lying dead. The lighting of that scene is not good, but at least it could be used to actually end the film. |
|
Of course that left the tank battle scenes, which
were never finished at all, but here again I got
adventurous. Playing about with the computer program
(which actually crashed a few times as I asked it to do
too much) I started re-editing the various clips of film
that were available, and then because there were gaps I
started making up some new stuff. I really needed some scenes of computer instrument panels lighting up, and a gloved hand activating the gun, so I just filmed them quickly with my digital camera. I didn't want to do too much of this as the visual quality is very different from Super-8 film, and would stand out, so the clips are shown very briefly. However the buttons and gloved suit are the actual 25-year-old props that I pulled from my loft, so are authentic to the period. |
| To find even more footage I went through all the
spare rolls and found a few useful clips, then I hit on
the simple idea of refilming some of the existing footage
from different angles, in close-up, or with a camera pan
to give the illusion of it being a different shot - which
worked out pretty well. The final vehicle explosions were
sadly never done, so quick cuts from my reel of
explosion-test-footage were inserted instead. Then I got really adventurous and added sound - blimey! I have to say that sound effects certainly add to the visuals but they are a pain to do. Some of you might have recognised the sounds as they may come from Gerry Anderson programs. The criminal's vehicle looks a bit like the Overlander from 'Terrahawks' and now also sounds exactly like it! Whilst the good guys truck sounds rather like the lorry from the 'Joe 90' episode 'Colonel McClaine'. Other sounds are from my washing machine!! |
| 'The Martian Experience' Part 4: Seek and Destroy Has sound - turn up your volume |
Click Here for YouTube Film |  |
| Of course like any other great film there has to be the 'Making of' video to compliment all this superb action. So like all the major studios I have cobbled together a load of old bits and pieces, plus some new stuff, to add to your viewing enjoyment. This video has had more hits on YouTube than the actual films themselves - which I find slightly odd! |
| 'The Martian Experience' Behind the Scenes Has sound |
Click Here for YouTube Film |  |
| I have to say that I have enjoyed seeing this old film again, and it almost makes me want to start again. In fact I do actually have a story, the characters, the starship, and I'm slowly working on the script. But you really need to win the lottery to make films like this. If I ever try to make one of these again I want a studio - and a crew who will hold things, pull things, make things, and do what I ask without them saying 'How much longer is this going to take?' |
'The Martian Experience' is a David M Sisson
Production 1980 - 2012
My thanks to Reg Sisson, Andrew Sisson, Martin Storey, and Tony
Groves for their assistance in making this minor motion picture.
All photographs, text, and spelling mistakes are copyright David
Sisson 2012
Back to Index