![]()
Scratchbuilding Spacehawk from Gerry Anderson & Christopher Burr's Terrahawks
|
|||
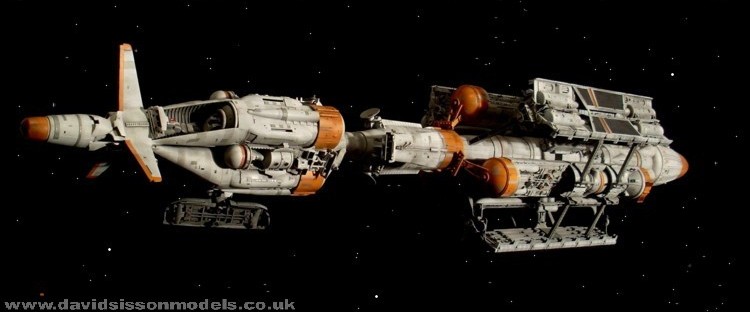
| The Terrahawks first line of defence against this threat was the mighty spacecraft called Spacehawk, which was in constant orbit over the planet watching out for the first signs of trouble. | |||
 |
|||
|
|||
 |
Over the years I’ve been in the process of building studio-sized reproductions of the models featured in this television series, and even restoring some of the original models to boot. The plan was to have most of the key hero models - but to get the ‘set’ would involve building a copy of the large Spacehawk, but that was something that I had chosen not to do. My reasons were simple, firstly my friend Phil Rae (who had designed and built the original SFX model. see - LINK) still had the prop in his collection and that took away a large part of the desire to ‘recreate’ this vehicle, as I had seen it so many times over the years. The other main reason was the knowledge that kit-bashed models involve a lot of work… And parts! 25 years ago I had
built a studio-sized model of the MKIX Hawk from Space:
1999. I thought it would be easy because I had looked at
photos of the original model in magazines and recognised
many of the cannibalised kit parts. I thought ‘This
is just a collection of Airfix Saturn V’s,
1b’s, Lunar Modules, and a few other bits …. so
it will be simple'. Unfortunately several years later I
had the opportunity to closely inspect the original
studio model and realised that I had missed off at least
a third of the detail, which meant building a new
replica. Another problem was the old, rare, and unknown parts that were used in its construction, could I really find vintage coffee jar lids, yoghurt pots, disposable razors and alike? All very doubtful. In order to build this craft I would need complete access to the original model for a reasonably long duration, and a duplicate set of vintage parts, and there's not much chance of that ever happening is there……. Then again it just did! |
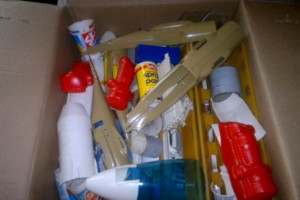
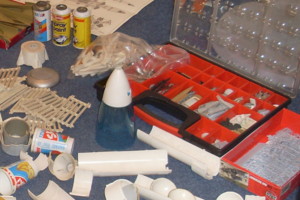
When Phil Rae first built the model he only rented it out to the TV production always planning to get it back after the show had ended. However on the off-chance that this might not happen he decided to try and assemble a spare set of parts in order to possibly create a replacement if required. When he managed to get the original model back those spares were no longer needed and were eventually sold off, ending up in the possession of Mr Paul Feagan after he bought them at an auction. After several years he realised that he would never do anything with them so offered to sell them to me. At the same time the original Spacehawk had sustained some damage and required a fair bit of repair work….. So I wonder who could do that? The box of spare parts was rather large
and came with several other bags of spares, including the
many disposable plastic razors that are required. I had
suspected from the start that it would not actually be
'complete', and that some of the parts would need
replacing for better examples - the most obvious being
that the Pegasus engines from the Airfix 1/24th scale
Harrier kit were only represented by a set of vac-form
shapes. Obviously buying three Harrier kits would be
expensive but as a long-time model maker I had those
items in my spares collection, together with all the
Airfix Saturn V parts too. |
|
I could now begin construction, but first there was a small problem to address - just which Spacehawk was I going to build? Usually with SFX models we are often faced with the fact that there might have been several studio models built to different sizes, and which featured different details or shapes. Luckily with Spacehawk there was only one model built and filmed so this classic modelling problem should not really exist - but unfortunately this model did change from time to time - and alter shape! Spacehawk version 1 - This would be the first incarnation of Spacehawk, which never actually made it to screen. The model was designed and built offsite and delivered to the studio in a finished condition, which included numerous antenna/probes and a front section that could rotate. SFX Director Ian Scoones removed the probes but not before the Japanese backers had seen it, which is why there is a Spacehawk toy with antenna. I know that Phil likes this version but its not one for me to build.
Spacehawk version 2 - The model was modified by adding pieces of front projection material to the hull to reflect light and give the impression of internal illumination. Further additional flashing light bulbs were added to various places on the outer hull as navigation beacons. This model, now minus the probes, was filmed at the start of the series and many of these shots ended up as stock footage which could be used for the rest of the production. However it still had a loose front end that would rotate between shots, meaning that the general shape and look of the model changed from scene to scene. So one minute the three wings on the nose line up with the rear Y-shaped sections, then they don't. Spacehawk
version 3 - For some reason the model had
some major reworking, probably caused by being damaged.
As model maker John Lee commented 'The
bloody Spacehawk was always breaking on set... Every time
it was moved bits fell off.... During my time on
Terrahawks everyone in the workshop took turns in fixing
it.' Spacehawk
Version 4 - The Official Blueprint. I
don't normally give much credence to 'official documents'
of TV shows but the plan was drawn by Phil Rae, who was
the designer/builder of Spacehawk. This does give a clear
view of how he thinks everything should line up, and of
course answers the other big Spacehawk question 'What
is Up & Down? Phil's plan clearly shows that the
three Hercules pieces in the front section are arranged
with two up and one down, with the antenna hanging low.
The small 'wings' in the next section should be
horizontal, and the Y-sections are also two up and one
down. |
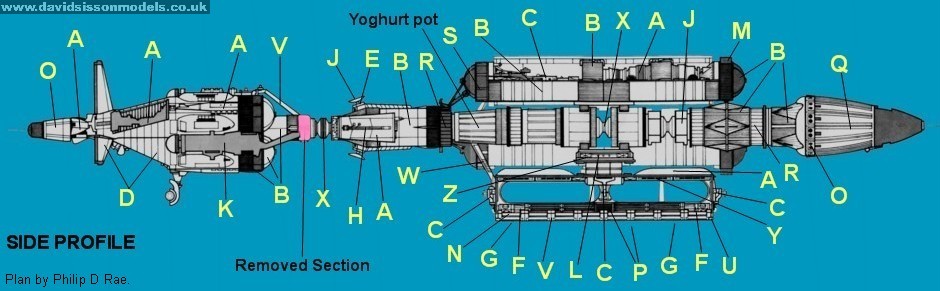 |
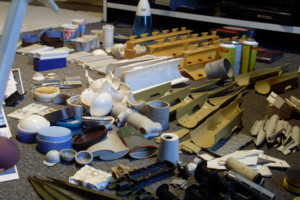
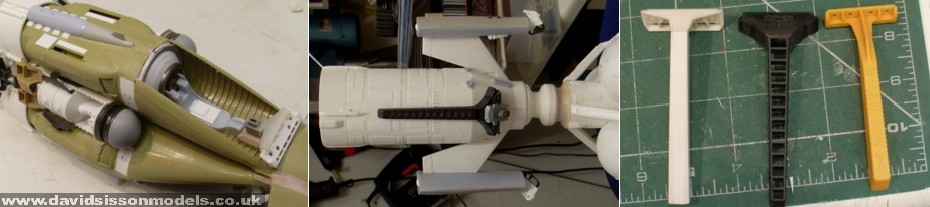
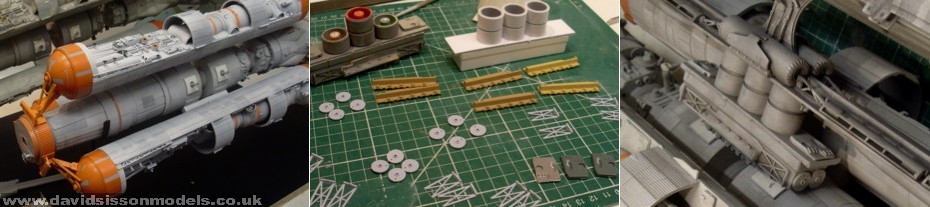
| Key parts. A - Airfix 1/24th scale Harrier B - Airfix Saturn V C - Airfix RAF Recovery Set D - Airfix
Hercules E - Airfix Bismark F
- Airfix Eagle
Transporter G - Airfix/Dapol Esso tank wagon H - Airfix Skyray J - Airfix Lunar Module K - Airfix Space Shuttle L - Airfix Matilda 1/76 M - Airfix SNR4 Hovercraft N - Revell Scissor Bridge O - Revell 1/24th Gemini capsule P - Darth Vader Tie Fighter Q - Caddymatic Tea dispensor R - Vintage coffee jar lid (Maxwell House?) S - Vintage coffee jar lids (Nestles) T - Plastic vents/grating U - shop window sunglasse's display stands V - Bic Razors W - Wilkinson razors X - Wedding cake plastic stands/pillers Y - 120mm film spools Z - 35mm slide holders. |
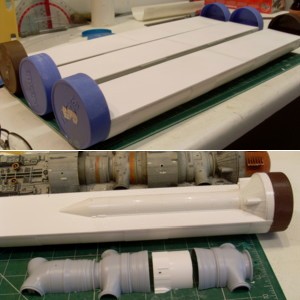
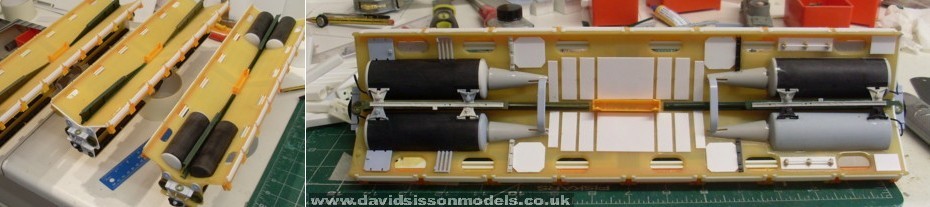
The Build Looking at the model I decided to start
on what was probably the easiest bit, the three smaller
side-pods. I began by gluing together the Saturn V hull
halves (length ways) together with a sheet of 2mm
Plasticard to form the basic shape, and then added the
coffee jar end caps. All very easy so far and wrong!! Of course this type of model making seems easier than my normal builds, which involve drawing out plans from photos with hundreds of calculations involved, then sculpting, carving, and moulding my own scratchbuilt parts. But this example proved that simply copying something sitting right in front of you is still problematic, with the first fault being that you assume that you know what you are doing! |
 |
 |
The three side-pods were quite
similar to each other with mostly kit bashed detailing.
One pod does have a slight difference as it uses a gun
turret from the Bismarck kit for no apparent reason. None
kit parts are a shallow plastic box and some small
plastic pyramids (that appear to be from a kids toy). The
build was reasonably quick here and it was a joy to
simply copy something next to me instead of peering over
countless photos with a magnifying glass. Final detail included a lot of additional panelling, much of which is added to the surface of the Saturn V hull parts. This is a series of random rectangular shapes cut from thin (15 thou) Plasticard, and it's a different pattern on each of the three pods. |
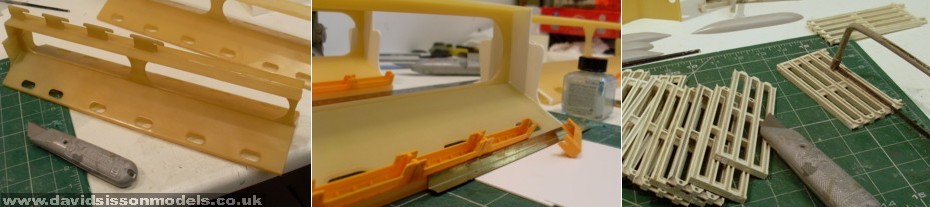 |
The Y-shaped sections were also reasonably simple but involved a lot more work. The general plastic shape was made from a very brittle type of plastic, with a number of cracks that first needed to be glued, before carefully cutting away a series of locating support pegs. I then sanded down the plastic to make sure the surface was flat and to get rid of the glossy finish. Next problem to be addressed was that each piece only had one end plate, so I had to fabricate the other side from sheet Plasticard - and while I was at it I also added two more layers of plastic to strengthen up the weak central support column. I could now start adding all the detail starting with the orange plastic razor blade covers that run along the edge on each side. Here I used a Brass angle section to keep all the parts straight, and at the same distance from the edge, whilst I glued them all into position. |
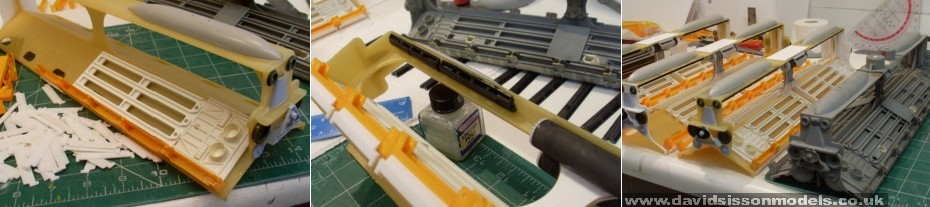 |
The next piece to go on was the
rather recognisable model kit part from the Airfix/MPC
Eagle Transporter, I'm sure many old-time modellers will
spot that it's the bottom of the passenger pod. It is of
course cut into two halves but I think you would need to
cut it into many more to really disguise its origins. I
needed six of these to complete the model but only had a
few, so this was one of several kit parts to be moulded
in silicone rubber allowing me to cast up resin
duplicates. The plastic grating pieces were now trimmed
to the correct width and glued into place, with the join
between each pair being covered by another kit part, this
time from Darth Vader's Tie Fighter - I didn't have this
piece so it was also moulded, but on this occasion from
the original Spacehawk. |
 |
Every side is covered in various
detailing, with some odd bits involved like disposable
plastic clips used to seal old style bread bags. |
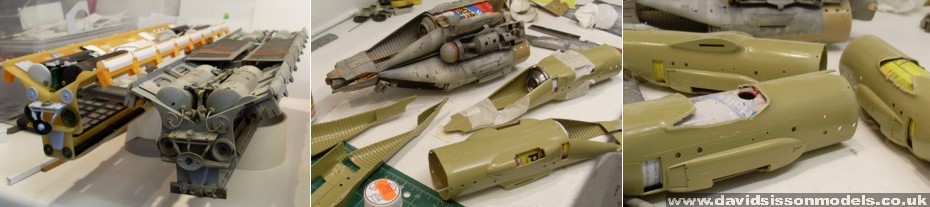 |
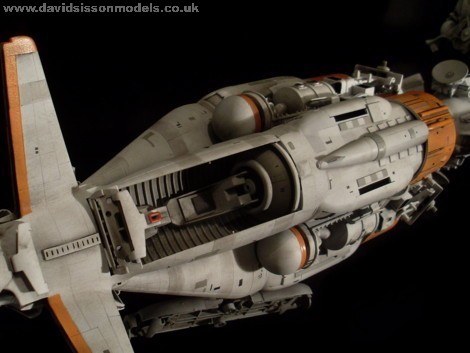
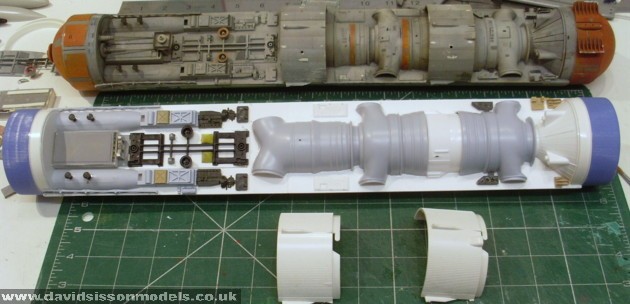
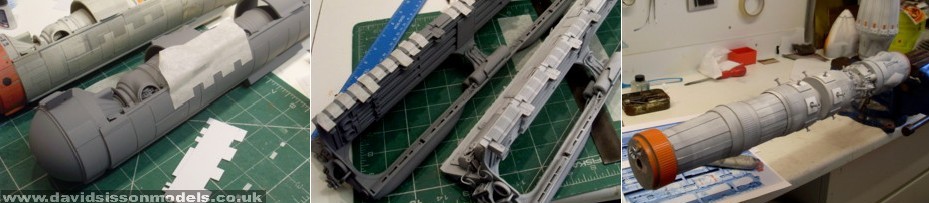
I could now turn my attention to the main hull and I began by tackling the nose section that is basically three Airfix Hercules aeroplane fuselages glued back to back. The front cabin sections had already been cut off, so I just had to do was glue the hull halves together with old paint cans inside. It was rather a tight fit that required a bit of fiddling about and I immediately got fed up with hearing the mixing balls rattling around inside the cans so I decided to remove them. I was a little bit concerned at drilling into a paint canister, but there was nothing left inside after all these years apart from some old paint dust - although I was surprised to discover just how big the metal balls were! |
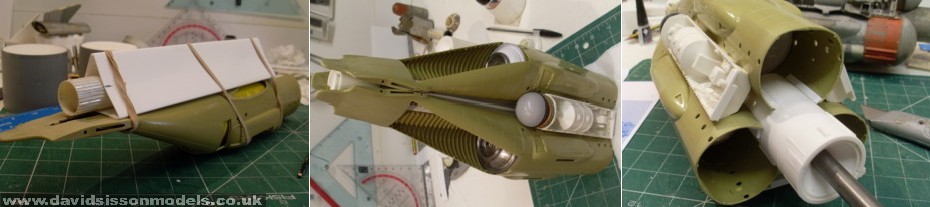 |
The three hulls were glued to a central triangular post which has a tube running down the middle. This tube is smaller than the interior hole so the sides have to be bent inwards to glue on to it, making the sides slightly concave and a better fit for the curved hulls. Three cargo bays from the Airfix 'Space Shuttle' kit were then glued between the Hercules fuselages to detail and reinforce this structure. Parts of the Hercules kits then had to be trimmed away to allow a tubular section of Saturn V (3rd stage section) kit to be imbedded as the connecting neck piece, and with this section now formed the metal support tube could be inserted into place. |
 |
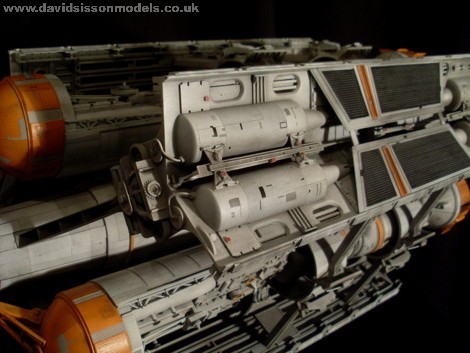
With this central support pipe in place the rest of the front hull could now be assembled onto it. This consisted of three plastic wedding cake pillar stands and more Saturn V kit parts, this time the 2nd stage rocket section being used with a short extension formed in Plasticard. Two disposable plastic razors are the most obvious details to be added here, but this section is also covered in more of the small and random shaped 15-thou thick Plasticard panels. |
 |
Further details were now added to
the whole structure, including more kit parts from the
Harrier - like the easily recognised ejector seats. More
plastic bits from disposable razors are also in regular
use here, and I was luckily to have almost all of them
supplied in the box of spares that I had bought.
Unfortunately after I had glued a few of them onto the
model I realised that the manufacturer had modified one
of the parts by adding an extra bit of plastic to the
design. This meant that I had to remove the affected
items and modify them all back to how they should look! |
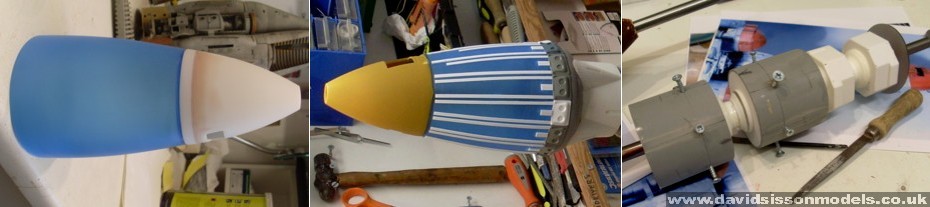 |
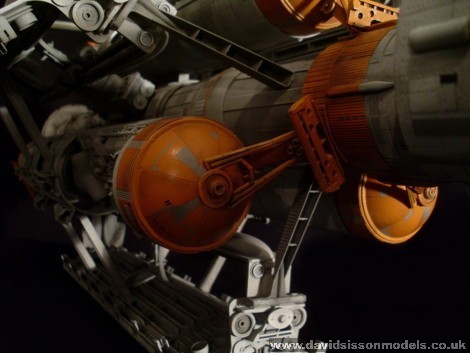
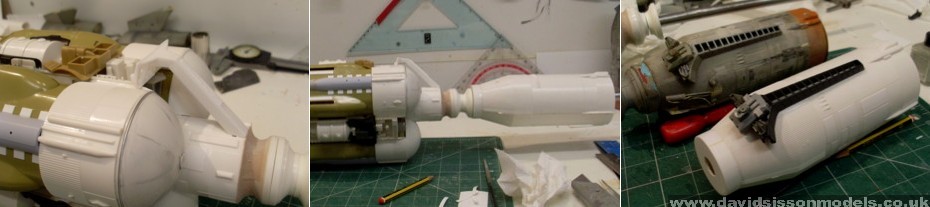
The rear Wasp-like engine section
is made from an old plastic Caddymatic Tea dispenser,
glued to an EMA hemispherical dome, which in turn is
mated to the base section of the Saturn V 1st stage kit
part. A slight problem was that this Caddymatic was
slightly different to the one used on the original model,
in that it had a longer dispensing section. To fix that
problem I cut the end off, trimmed away several
millimetres, and then fixed it back into place with some
filler to remove the join line. The outside was then
detailed up in kit parts from several Revell Gemini
Capsules and strips of Plasticard. |
 |
| I didn't have those pots, but I would
not have used them anyway as these parts of the model
support the various sections that extend out from the
hull - and as a result the ones on the original model had
eventually shattered! So I built my sections from EMA
tube with 3mm Plasticard end caps, sunk a series of steel
screws half way into the outer surface, and then put
fibreglass resin on the inside to strengthen everything
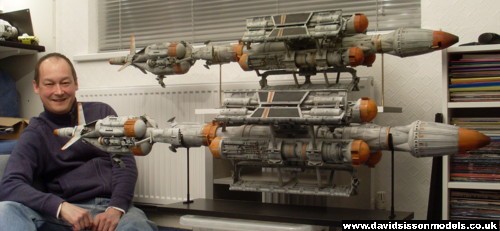
up. I also did a similar thing with the yoghurt pot, first putting a plastic tube in the centre to allow the metal support tube to pass through, and then filling up the rest with polyurethane resin to make it solid and strong. Also I only had one of the coffee jar lids so that was moulded in silicone rubber, and then I cast up the four that I needed in a mixture of car filler paste and resin. Photos above right: As the finished Spacehawk model would be over 5-feet long and therefore really dreadful to move around the house, or transport in my car, I had decided from the start that it would be built in two halves. The steel tubes in each half can be joined together by simply adding another thinner tube down the centre; whilst a large screw head protruding from the rear half locates into a slot in the front part, allowing them to lock together with a simple twisting action. |
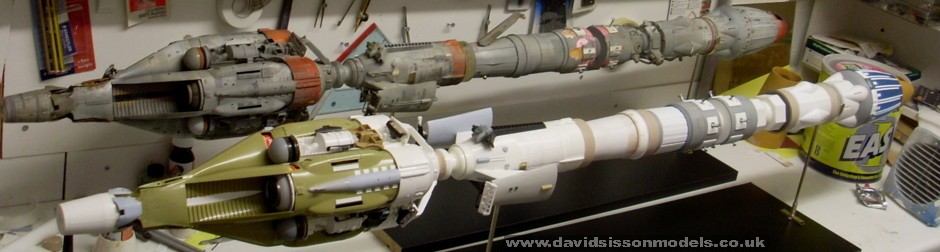 |
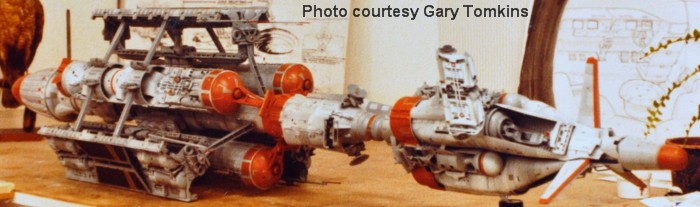
Photo
above: The original model was repaired at
the same time as the replica was built up, partly because
it seemed to make sense, and partly because I thought I
would loose interest in one project if the other got
finished first! |
 |
| Due to it's large size the model was
painted and weathered whilst it was still in separate
sections. The colour scheme caused me a little bit of
concern because I couldn't quite decide what the original
colour actually was - dirty White or Grey? To begin with
I tried a couple of grey paints before deciding to go for
an off white paint finish. I did this by spraying the
parts in grey primer and then covering that with thin
coats of matt white primer. Pictures above: There are a series of repetitive panel effects on the model and I created these by applying masking tapes (cut with the use of templates) to the grey finished surface, then sprayed an initial coat of white, removed the tapes and then applied a second coat, thus creating the two different tones. For the orange there was yet more confusion, as there are clearly two different colours on the original Spacehawk! Signal Orange is used on the middle section of the model, but a darker (more red) shade is used on the nose and tail areas? As I was using Signal Orange on all my other Terrahawk models I decided straight away to use this shade on my replica and maintain the continuity. |
 |
The side pods were the first items
to be attached to the hull, using just a small length of
EMA square tube. The struts at the front end are mostly
decorative and consist of a cut down BIC razor and some
unknown kit parts, which I again moulded off the original
Spacehawk. |
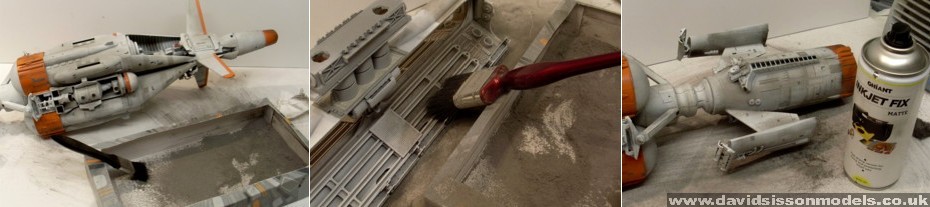 |
The 5-foot model painted in its
clean White and Orange finish looked utterly toy-like and
absolutely dreadful! After all these months of effort and
expense it was looking like my efforts were going to
result in a massive disappointment! To fix the problem
and make this replica look like a decent model it needed
to be weathered - but how could I weather a five-foot
highly detailed model? The answer was to apply dry
powder.... and lots of it! |
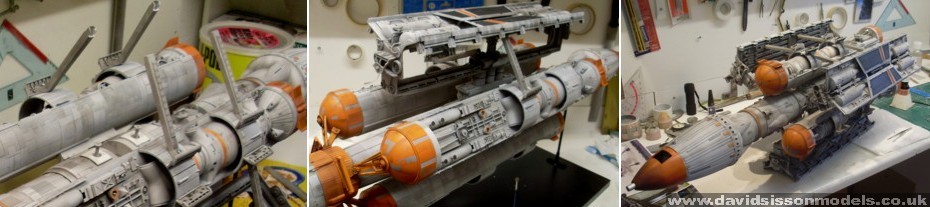 |
Final assemble took several days and a fair bit of effort to set everything straight and level. Each Y-Section was glued to the hull over the protruding screw heads to give a strong bond, with the BIC razors trimmed to fit into position and give additional support to the structure. Then the final pieces of Bic razor could be glued into place over the screw heads. The last major piece to be built was the front radar/communications assembly. This section is just a mix of kit parts which creates quite a fragile structure, and if I had fixed it in place securely it would almost certainly have got damaged very quickly when I moved the model. As a result I just put a powerful magnet in the base and a piece of steel in the Spacehawk hull, so now I can remove or reposition the radar at will. Final details were now added, consisting of panels lines drawn on with a black Biro, hand painted panels and markings, various Letraset transfers, and a series of reflective tapes. These tapes were supposed to represent the illuminated windows in the spaceship and were added all over the model. To make these I bought some highly reflective tape off ebay, the sort used to reflect car headlights at night so people can be seen in the dark. The tapes were cut into different sized sections and then I had to paint intricate patterns all over them to leave a series of miniature square and rectangle shapes, that would then create the illusion of tiny windows. This was a tiresome process, every time I thought I had finished I found some more that I hadn't done, but again having the original model to directly copy from made the job possible. |
|
||
|
Interview with Phil Rae - the builder of Spacehawk
Scratchbuilding Spacehawk; Text and photographs copyright David Sisson 2015