![]()
Restoring a Space: 1999 Spacesuit costume______________ Back to INDEX
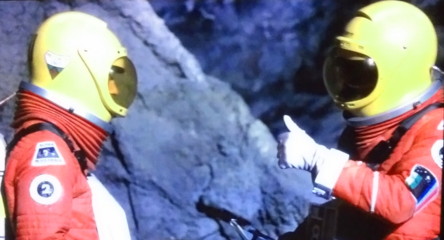
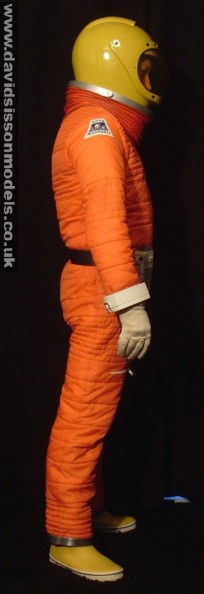
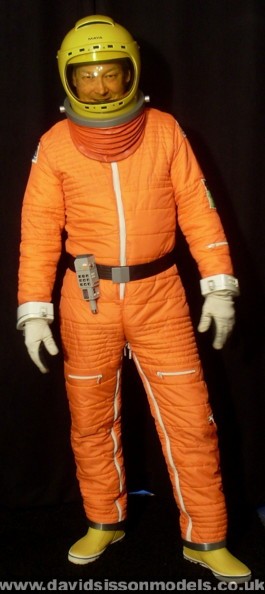
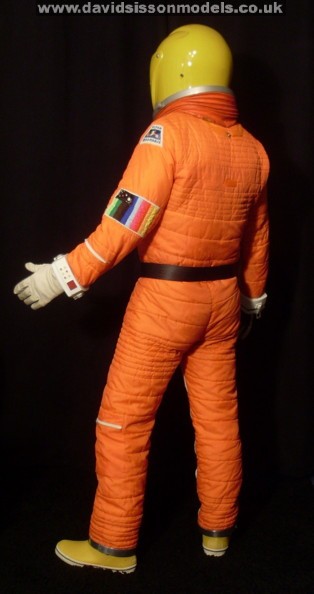
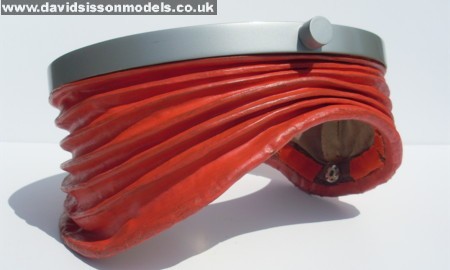
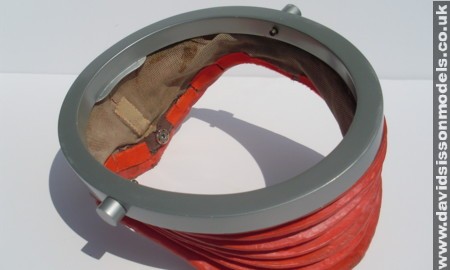
When I watch a science fiction film or television series my main interest is in the models and SFX but I also enjoy looking at the sets and costumes, especially the spacesuits. In fact my respect for any production is often affected quite a bit by the quality of the spacesuits - or lack of them, as many shows don't often bother with such things and the problems associated with the actors wearing them. This is a shame because I find it very difficult to take any space related show seriously if the actors just walk around in their normal outfits in dangerous environments. My favourite spacesuits are from UFO/Doppelganger, Space:1999 , Moon Zero Two, and 2001. So when a '1999' suit came up for sale it was something that I just had to have. This is 'Suit 4', which is a little bit on the small side and only just fits me, together with the 'Suit 1' rubber neck collar assigned to Martin Landau. When I watch the series I always try to identify it, helped by the fact that all the suits seem to have small differences - mine being one of a couple that have a zip on the left arm. Often it seems to be worn by a minor character but I believe that Barry Morse did wear it at times - but then went on to wear a bigger and looser fitting one. The suit came from the 'Alton Towers' collection and had been on display there, and at Blackpool, for many years and as a result it was not in a very good condition - like many original items I happen to get my hands on it looked completely knackered! |
||
 |
||
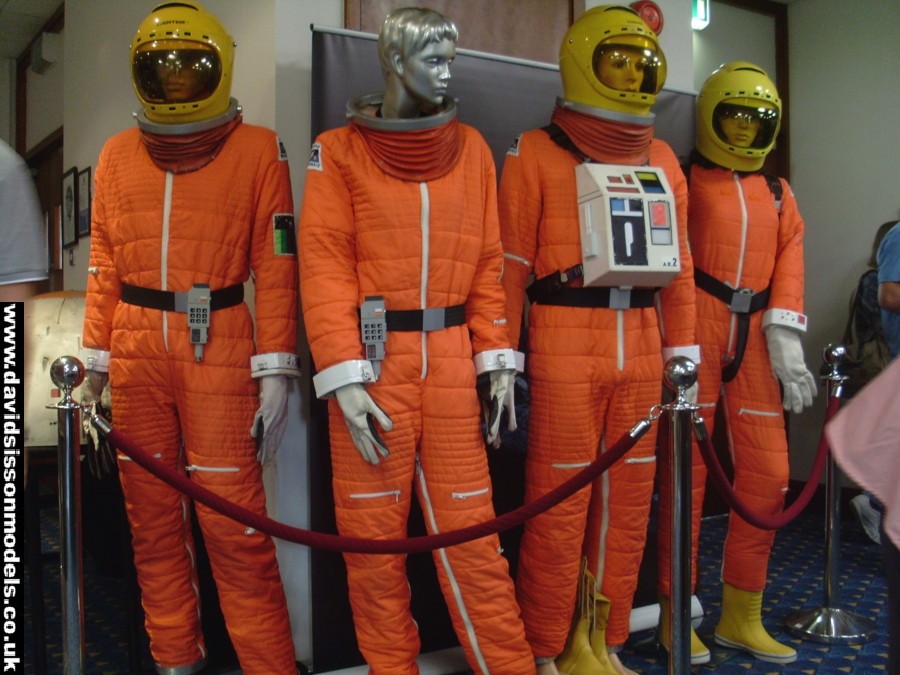
| Above: My suit on display (no helmet) in the largest public display of surviving Space: 1999 spacesuits ever assembled. | ||
The Restoration ....by David Sisson ..............See Science Fiction Modeller Issue 17 Nov/Dec 1994 For my money I got a one-piece orange bodysuit, a pair of gloves, a rubber neck piece and a helmet. Oh yes I also got a mannequin that had been assembled and fixed in a pose - whilst wearing the suit - and as a result it required the use of a very large hammer to smash up and remove. |
||
 |
||
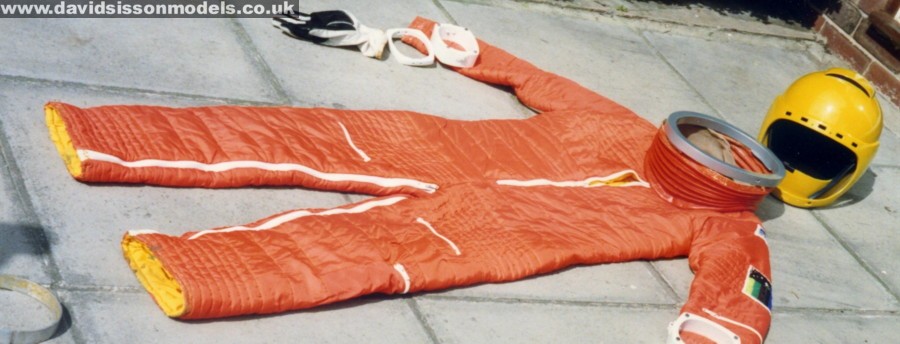
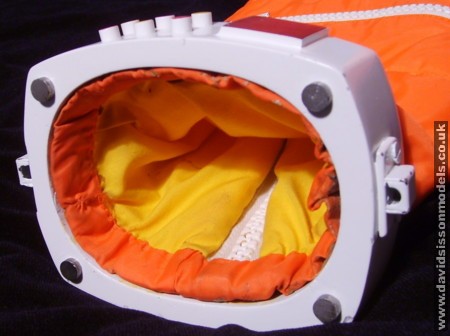
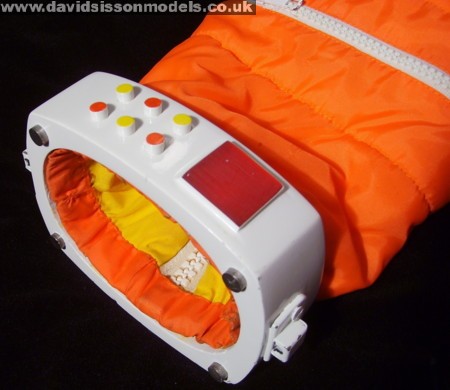
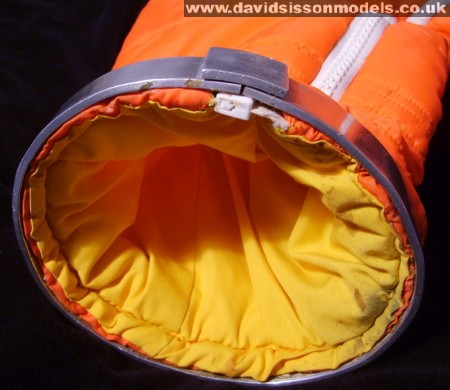
Once I got the suit off the dummy I examined it closely, but not too closely because it hadn't been cleaned for years and my skin was crawling from just being near it! The single piece suit was nearly in three pieces as the right arm was coming off at the shoulder and there was a split down the back - luckily both were due to the seams giving way and not the material. The material in question is a bright orange nylon with a yellow cotton lining and a white fluffy padding in-between - just like a sleeping bag actually! A resemblance heightened by all the zips, most of which are sewn shut. The only add-ons, apart from the arm badges, are two fibreglass wrist arm/glove joints and two aluminium bands at the ankles, all four of which are just glued in place and could easily be removed prior to washing the suit. The first (hand) wash removed a great deal of dirt but was complicated by the fact that the material acted like a sponge and absorbed nearly all of the water, then threatened to fall apart under its increased weight. Luckily it dried rather quickly and I was able to sew it all back together again and patch a small tear in the back. Then I could safely wash it again - and again - and again! It really was filthy and inbetween washes I even resorted to using paint thinners to try and remove some stains as well as having to scrub the interior to try and remove all the car filler that had been used to assemble the mannequin..Finally I let the suit dry and it was almost unrecognizable from its former state, the material which was decades old, and slightly worn in a few areas, looked bright and quite new. I could now reattach the two aluminium ankle bands, which had only needed a quick rub over with metal polish to restore them.. |
||
 |
||
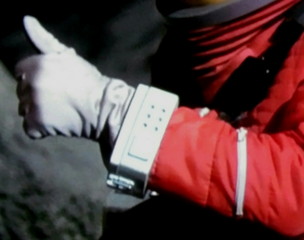
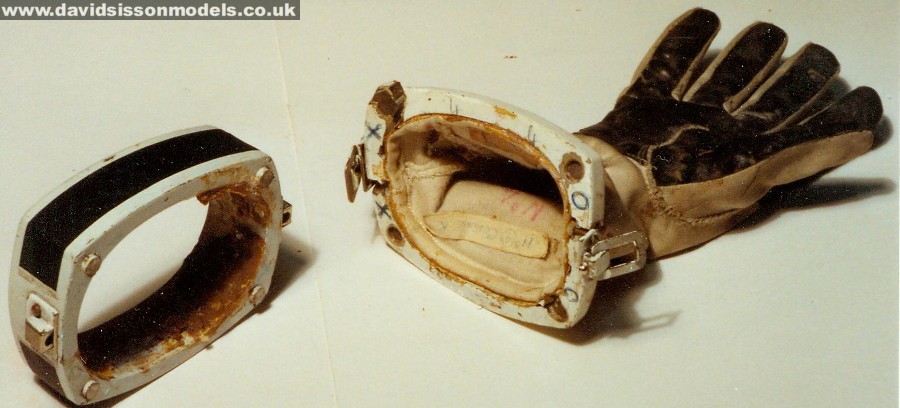
Unfortunately
the wrist connectors and gloves required more attention.
When the suit had first been made the gloves were simply
joined to the suit using magnets, four of which are fixed
into the heavy fibreglass wrist castings with metal
plates buried in the matching fibreglass glove ring.
During the series these clearly proved inadequate
(especially for series two's regular fist-fights on the
Moon surface) so large metal buckles were fixed to the
sides to secure the connections. |
||
|
||
| Having
replaced the missing buttons I was surprised to see that
the suit was actually filmed this way in the episode 'The Bringers of Wonder - Part 1', and the red square had been overpainted too! |
||
 |
||
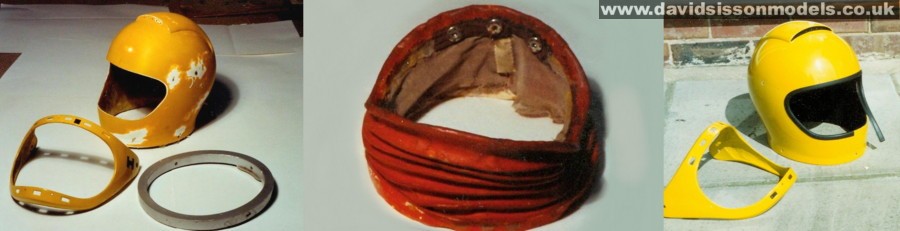
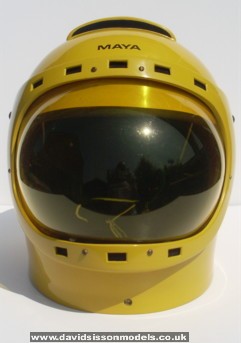
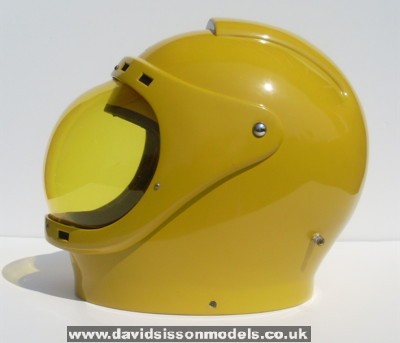
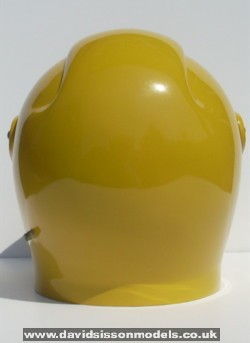
The
worst part was the helmet, which was very battered, and
the clear visor was unfortunately missing. The rubber
neck piece was in a poor state and the spring loaded
parts that secure the helmet to the neck ring were also
gone and had been replaced by rusty screws that had been
forced through both the ring and the sides of the helmet.
The visor
frame also had a fair number of cracks but here I could
only remove any loose bits of surface material and refill
the holes. After the repairs were complete the parts were
spray painted with cellulose car paints and then rubbed
down with a cutting agent to get a very polished finish.
New pieces of black cloth were cut out, using the old
pieces as templates, and glued into place then the head
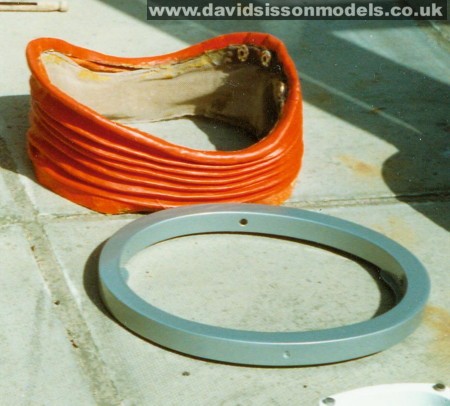
straps were reinserted. The fibreglass neck ring needed several holes filling before it was repainted. The two spring loaded neck bolts were made using epoxy filler blocks with a brass rod embedded in the centre.. The rubber neckpiece had been supporting the weight of the helmet for years and was compressed and deformed. I had to gently stretch it out and then apply more latex rubber to the inside to hold it in shape. The outside was cleaned, and any holes patched with drops of latex, before it was given a coating of watered down acrylic paint.. |
 |
 |
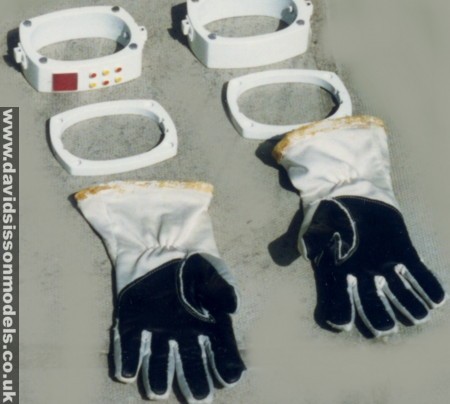
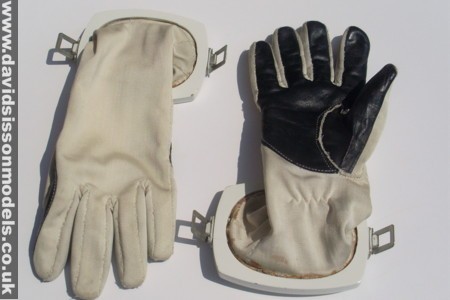
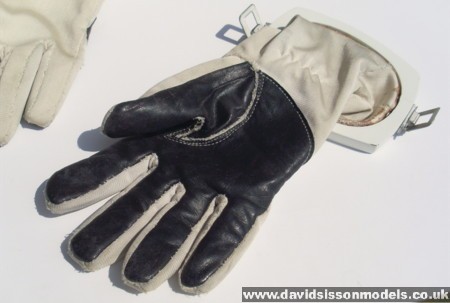
| Gloves appear to be standard store bought items, makers label reads 'LesLeston'. Silky white material with black leather palms. |
 |
 |
| The neck opening at the bottom of the helmet is 254mm from front to back and 212mm at its widest. The black vent across the top of the helmet is 120mm wide. The helmet appears to be around 285mm tall. |
 |
 |
 |
 |
 |
 |
Red Perspex square
is 26mm by 25mm.Buckles on the wrists have the brand name
'Cheney'. |
|
 |
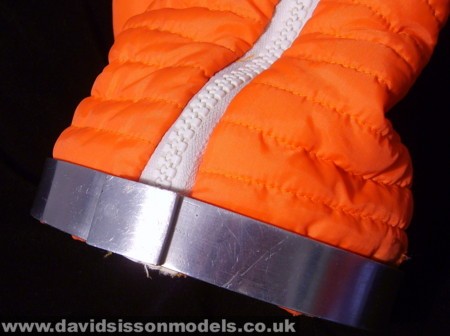 |
Mistake - I glued the Aluminium rings back on in the wrong position, thinking that it made more sense to try hiding the join on the inside of the leg when they should actually be clearly seen on the outside. (Aluminium is 1-inch wide and 1/8th thick) |
|
 |
 |
 |
 |
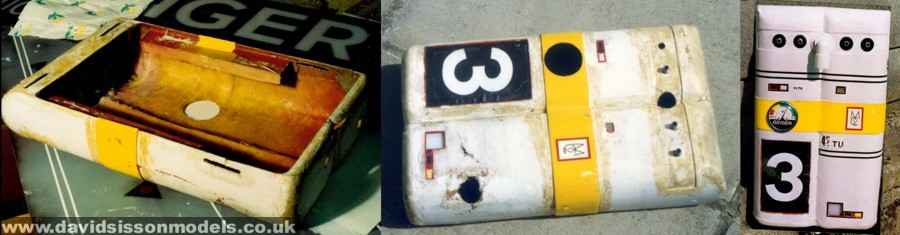
When I got the suit part of the 'deal' was for me to restore a backpack and recreate the chestpack for a display that was fast approaching. The backpack had the number 3 on it but it was actually the number 7 stunt pack used in the last few shows featuring 'punch-ups' on the moons surface. As a result it was very battered and I had to strip the parts off it and apply more fibreglass to the inside to fill the holes and strengthen it up. The backpack and chestpack are covered in a fine mesh cloth, only bits of the original were left on and even these looked like replacements and might not have been original at all. The unit was covered in new cloth and the various detailed parts reattached. One of the four oxygen outlets was missing and needed to be replaced, these turned out to be motorcar brake pipe connections and the airtube itself was coaxial television cable with the outer plastic removed. |
 |
The replica chestpack was formed in 2mm Plasticard, then coated on the inside with fibreglass with a Perspex backplate screwed to wooden blocks embedded on the inside. The recessed panels were made from clear Perspex (painted on the back) with pinstripe tapes to complete the detailing. Due to time constraints and a lack of the proper car seat belts there were no straps put onto the chestpack, instead the existing straps on the backpack were adjusted to reach over and hook onto the back of the chestpack. During this time my intention was to construct copies for my own suit, but after working on these parts I realised that I didn't really like them enough to bother! The design and construction is rather crude and they are big items to have hanging about the house. |
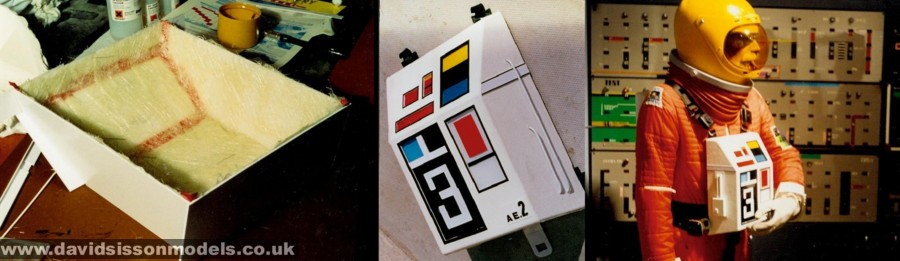 |
Above scratchbuilt chestpack, made very quickly for a display in Wolverhampton. The suit is reasonable comfortable to wear, but it gets warm quickly especially with the helmet on. Over the years I have watched actors wearing spacesuits in films and wished I was doing their job, but having worn a suit for a short length of time I'm not so sure that it was really that much fun to be filmed in it! |
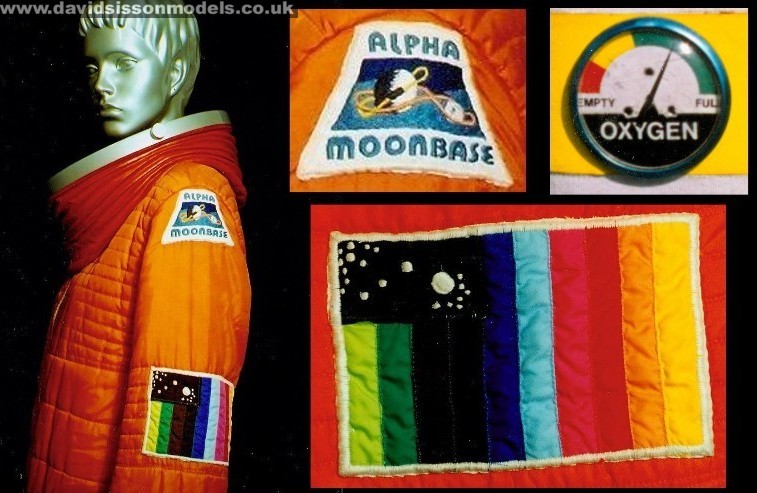
| Left; The
'Rainbow' patch is made from lengths of coloured Nylon
ribbon. Lime, Green, Dark Brown, Black, Dark Blue, Light
Blue, Purple, Red, Light Orange, Yellow. Black rectangle is a different material with Stars sewn on in white cotton.. |
 |
*I've now
posted a short film about this spacesuit on You-Tube,
which you can see HERE |