![]()
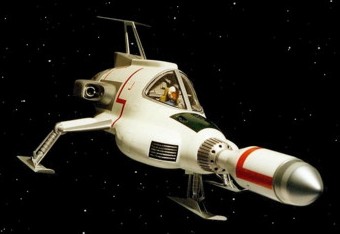
Building the Moonbase Interceptor from Gerry Anderson's U F O
|
|||
| I'd been meaning to
build an Interceptor for quite a while. Considering how
popular a craft it is I'm surprised that I've not seen
many scratchbuilt versions at model displays and
conventions. But then again we are lucky in that one of
the original studio models still exists and has itself
been on display at many such events. As a result of this I decided that my replica should be built to the same dimensions as this original and was able to take plenty of measurements to help in drawing up my blueprint. This particular model is the large version which at just 25 inches isn't, to my mind, actually that big! |
|||
 |
The Build ..... By David Sisson ... See Sci-Fi & Fantasy Models Issue 15 Oct/Nov 1996 I started by drawing parallel lines across the side profile, with a 1/2 inch gap, to act as a guide. Then created the basic shape of the body by cutting out a series of outline shapes, from 1/2 inch sheet balsawood, using the top plan view as a template. These layers were then glued together and left for a couple of days to set. I usually glue the pieces together in subsections and place heavy weights on top to compress the sheets until the glue has set - otherwise gaps can appear overnight. All this can then be worked to a rough shape with a Stanley knife before final shaping with sandpaper. It can take quite a while to sand the wood to the right shape, although Balsa is a pretty easy material to work with - in fact too easy sometimes. During the process certain key features are drawn, and redrawn, onto the surface to act as a guide. Also some areas can be marked and protected by gluing Plasticard in position - such as the front area where the missile support attaches. |
|
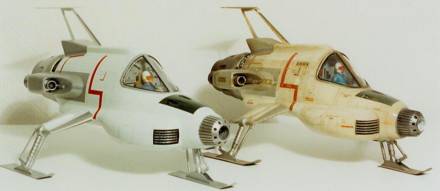
Instead of trying to
fit the small engines to the curved sides of the model I
cut slots in the sides into which the engine blocks could
be inserted. Then I could shape the engines and blend
them into the hull - before cutting them off again! At this time I decided that I still wasn't totally happy with the shape of the model so instead of doing a thin fibreglass casting, that I would not have been able to adjust, I resorted to just using P38 car filler.This allows me to resculpt the hull afterwards and it was something I had done before on Thunderbird 4. The engines and small stub wings were now cast up and attached and then final sanding and shaping could commence. The top ridge on the stub wings was also an undercut as it ends 2/3rds of the way up. For the purposes of moulding I extended the ridge on the master then put P38 into the plaster cast that was easy to remove in the final fibreglass casting. The pilots area was cut away and used to heat form a canopy from transparent plastic sheeting. The basic big rear engine shape was actually made quite easily by smearing P38 filler inside a plastic flowerpot! Then the recessed areas were cut and filed out. Plastic tubes, kit parts and sheet styrene formed the core of the engine. The model was given multiple coats of spray filler and rubbed down with wet & dry paper to get a totally smooth finish. The three support legs and the thin top fin were then all made in brass, soldered together with a mini-blowtorch. The skids were cut from brass strip, the ends cut and filed to shape and then gently hammered to get the curved shape. Rubber moulds were used to generate some parts, including the pilot and the four small engine bells. Luckily I was given a rubber mould of the original small rear bell but casting it would have created a solid 'filled' bell. To remedy this I glued a conical kit part to a handle and after waxing it pushed it into the mould before the castings had set to create the hollowed finish. The master for the missile was formed by a collection of kit parts and a piece of plastic hamster tube - the tip had to be shaped in Plasticard and filler. The two sections were cast separately with an aluminium tube placed in the mould to form a strong attachment point. The master for the missile support mount was again formed in filler, with plastic strip detailing, then a rubber mould was generated. During the casting process a plastic tube was centrally positioned to create an internal sleeve. The final job was to attach the legs which are rather delicate and have a tendency to twist if you don't put the model down perfectly level. As a result I decided not to have any sort of suspension effect and securely fix them in a set pose. |
|
|
||
|
 |