![]()
Building the Moon Mobile from Gerry Anderson's U F O
|
|||
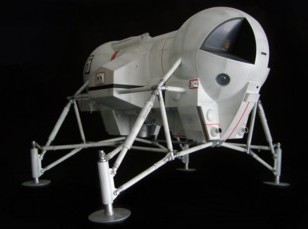
I have always liked designs that feature spheres and also intricate framework, so I have built a few Moon Mobiles over the years, starting in my youth with the usual crudely modified ping-pong ball models. For my latest versions I went up to the same size as the main studio models - that were only around 17 inches in length. |
|||
 |
|||
 |
| The Build .....by
David Sisson..... ...I
started the project with four 6-inch hemispheres, from
EMA Supplies, and a bit of leftover plastic waste pipe
from my XL5 scratchbuild. |
|
The hemispheres were
glued to the tube; screws embedded in the smooth domes
gave the glue something to hang onto. The edges of the
thick-walled tube were trimmed to match the curve of the
domes but a small amount of car filler was still needed
to create a smooth join. As I was going to mould
it in two halves I had to ensure that the two lower
sections (which were removed and cast separately) and the
two side extensions were made with perfectly parallel
sides - if the outer ends were even slightly wider the
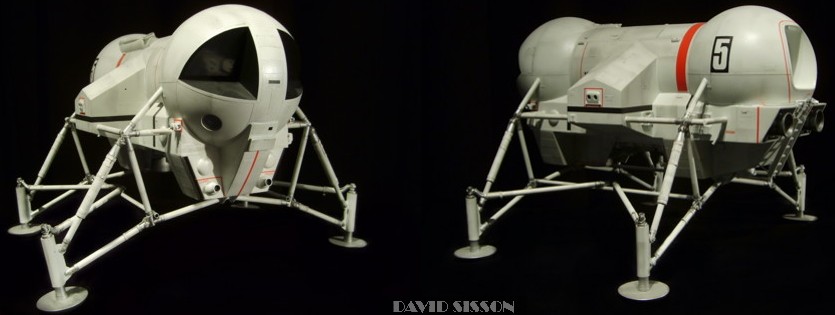
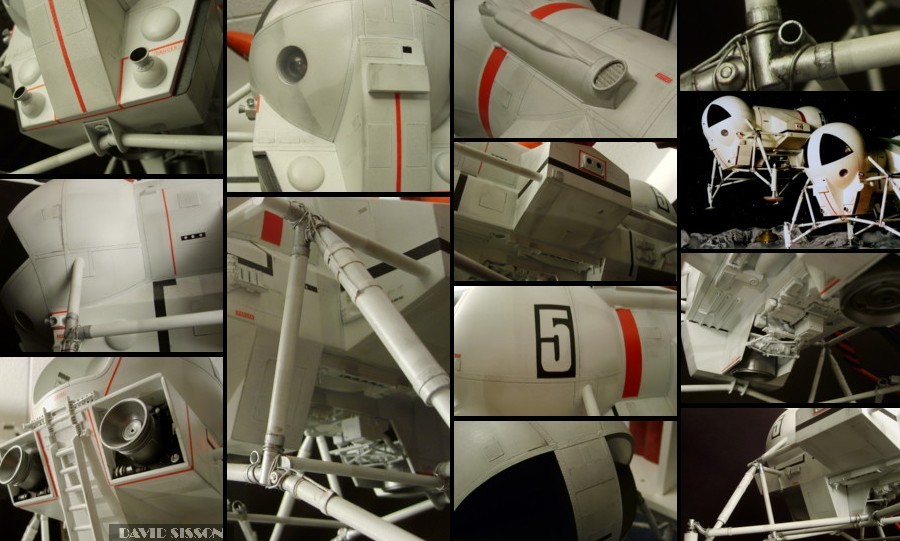
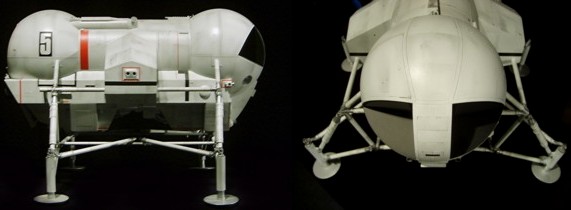
plaster moulds would not be removable. An initial mix of resin and car filler is applied to the plaster mould followed by two layers of fibreglass matting and resin. The rough edges of the cast halves were sanded smooth and the parts superglued together, with more resin and fibreglass matting added to the inside join. The windows and rear hatch openings are roughly cut out then carefully adjusted to their correct shape. Several coats of spray filler were applied and the model rubbed down with wet & dry paper to get a smooth finish. The slightly uneven base was levelled and two wooden blocks glued inside the open edges to provide a platform for securing a Perspex plate, which would later allow me access to the inside of the model. On this first version (pic left) the lower sections are all made from 2mm Plasticard whilst on later ones I cast some of the parts in fibreglass. The window recess areas are made in a thin layer of P38 filler, smeared across pieces of Plasticard that are held in position whilst the filler sets and are then peeled away. The same for the rear hatchway, filler applied from the inside around a plastic shape that is then removed. The trickiest part of the project was fixing all the legs in place. Much of this is 1/4 inch Brass soldered together and embedded deep into the hull and anchored with glue and car filler. The hull was now detailed with kit-parts and the Moon Mobiles distinctive ribbing - that is created by the application of Letraset Letraline tapes. On this latest version I also applied many pieces of self-adhesive paper labels to help break up the flat surfaces, as I find that white painted models can have a slightly boring finish - or it's just harder to make it look interesting. The leg pieces were fabricated from more Brass sections with the feet being cast in car filler. The main telescoping leg struts have small springs inside to give a cushioned bounce when the model is set down. I've spent a great many
hours looking at the few photo's of the original studio
models and it's hard to really understand exactly how the
legs were put together. In the end I came to the
conclusion that all the parts are just bolted together
loosely and then have pieces of wire wrapped around the
joints to hold the parts together and restrict the
movements. Of
course it could be that the wires were not on the models
originally but added during the shoot as the designer,
Mike Trim, stated 'The legs stopped working after a short
time of filming, probably just clogged up with dust.' |
|
The leg design is not very good from a practical standpoint. Each leg strut only has one horizontal support and this attaches to the top not the middle, so as a result when the legs go up and down this support pushes and pulls at each leg causing them the twist. Therefore it's a good idea not to have the legs move too much anyway. The heavy kit-part detailing on the bottom is attached to the Perspex plate that is screwed into position and can be removed to get access to the interior of the crew cabin. Internal details were fairly simple; two Revill Gemini pilot figures were modified to match the UFO spacesuits and just attached to a bulkhead outfitted with some parts that I had left over from my SHADO Mobile build. |
The model was sprayed with acrylic white motorcar paint. The big red band is also sprayed on whilst the thin red lines are Letraline tapes. The number 5's were created by applying the black spray paint over numbers cut from masking tape. Weathering was done by rubbing on graphite pencil and black powder paint, sealed on with clear lacquer. |
 |
The rear ladder assembly was finally scratchbuilt in brass - after I kept on breaking the plastic ones every time I picked the model up. Note the front windows actually angle backwards with the lower panel angling upwards towards the centre corner - a bit like the Eagle. There is also a possibility that there should be a ridge around the outer edge, making the panels slightly recessed, but I'm not fond of that idea. |
 |