![]()
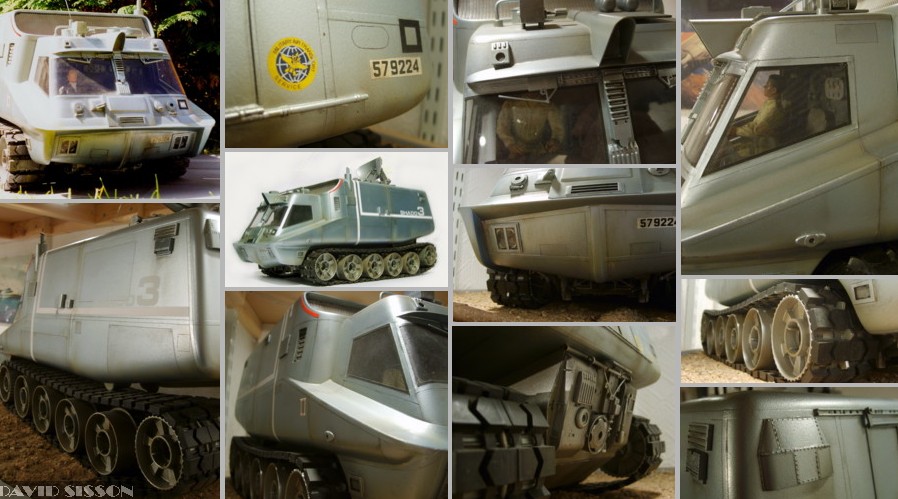
Building the SHADO Mobile from Gerry Anderson's U F O
|
|||
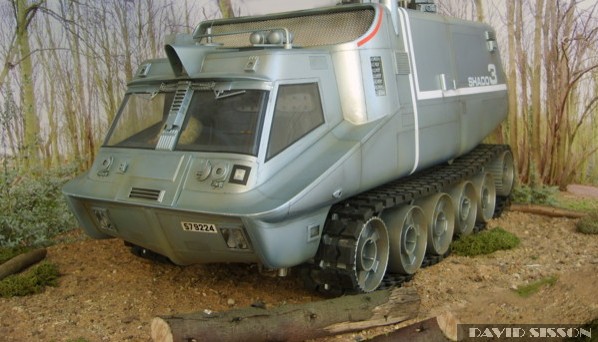
| These vehicles would be
transported around the world to various UFO landing sites
via large container lorries or aircraft. One mobile would
normally be designated as Shado Control, complete with
large rotating radar dish, whilst the standard Mobile
came equiped with roof mounted retractable cannons and
depthcharges. It appears that the mobile was only built in one size, approx 20" long, although there was some larger close-up sections built. |
|||
 |
|||
 |
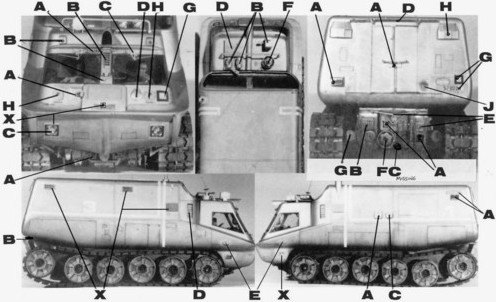
The Build ........by David Sisson I've wanted one of these
models for along time and was collecting reference
photographs and a lot of the model kit parts required
when a friend, Kevin Pedley, offered to lend me his
moulds from a replica he had just built. As a result this
'how to build a mobile' article is rather short and
really just a quick overview of the basic assembly. |
 |
Kit
parts from - |
Bodyshell My first job was to check Kevin's measurements against my photo collection to see if I agreed with him. This is because my golden rule is never to trust anyone's model or blueprint, no matter how good it appears to be - my second rule is never to trust my own blueprints! Overall the dimensions looked good, but Kevin had mentioned that the lower side edges were too square, so I applied plenty of car filler to these areas of the mould, before applying the fibreglass, so that I could easily sand down and reshape the finished casting. One part I wasn't too sure of was the front lower chin area, so here I took a separate cast and reworked the shape. Then a plaster mould was taken and a thin fibreglass casting made which was superglued to the body shell. Drilling and cutting out the large top vent caused a problem because the roof immediately bowed inwards. To try and cure this I turned the model upside down and stuck a steel rod and more car filler under the roof and put a weight on it to keep it flat while the mixture set. Afterwards there was still a slight indentation, so I fixed that by skimming over with more filler. Yet more filler then had to be smeared around the inside edges of the vent, as the fibreglass bodyshell didn't have a consistent uniform thickness, that is required here with the exposed edges. Surface detailing could
now be added together with the interior cabin. The
drivers cabin is
the trickiest part of the model as I always think that
the success of many model projects can hang on getting
the window shapes correct. The cabin of the Mobile whilst
appearing to be mostly flat-sided has large windows with
curved edges, many mobile replicas fail to get enough
curve on these edges and the cabins end up looking too
square. So I decided to make the cabin in car filler with thin moulded windows - this way I could sand down the filler to get the round edges I wanted. The useless Perspex cabin was used as a master to generate a plaster mould. The plaster was left for a week to dry and sprayed with paint to seal the porous surface, then waxed and the car filler applied. To get a consistent wall thickness to the final part pieces of plastic square tubing were glued into the mould to act as spacers. Then when the P38 was added thick pieces of Plasticard were pushed down onto theses spacers sandwiching the filler and ensuring that the inside of the casting would be as smooth as the outside. Due to the messy nature of this technique the filler was added in four stages (one for each side) with the Plasticard pieces being removed as each lump of filler set. When the finished cabin
piece was removed from the plaster mould I just had to
fill in a few minor air holes and give it a rub down with
wet & dry paper before drawing in the window
positions. Finally I could make the windows using thin transparent Plasticard. Here I took a long rectangular strip of plastic and holding both ends played the centre carefully over a hot paint-striping gun until the plastic began to go soft. Then placing one side over the front window area I gently pulled the plastic (without stretching it) around the corner edge and held it firmly against the side window area. Within a few seconds the plastic had cooled and the window shape was made. I repeated the procedure for the other side and then made duplicates as well - just in case of accidents. The windows areas were now drilled out and the edges filed flat. Then a 3mm strip of the surface around each window was removed to a depth of half a millimetre or so, enough to accommodate the plastic and the glue. The window shapes could now be cut out of the transparent mouldings - 3mm bigger all round, and then dropped into their positions and secured with quick setting clear epoxy glue. Normally I would have to spend time blending the windows into the bodywork but the mobile is covered in tapes prior to painting which did the job for me. The cabin is not fixed to the body but is a detachable part that allows access to the inside. It is held in position by a screw in the roof and by a raised ridge that runs around its base. This ridge was formed now in car filler with the cabin sides covered in sellotape to stop the filler from bonding to it. The model was detailed with various kit parts from the Airfix Scammel Tank Transporter, James Bond Autogyro, Revell 1/24th scale Gemini Capsule and the Life-Like Honest John. I didn't have all the parts but luckily Kevin had made rubber moulds and I could produce these parts in resin. The final detail to add before painting could begin was the Letraset Flexline tapes. These 1/8th diameter tapes are applied all over the Mobile, and many other UFO models, to break up the smooth surface and create a panel effect. After painting the panel lines are first drawn in using black biro, then the paint is gently cut using a sharp blade to highlight the line. Finally black enamel paint mixed with thinners was run over the lines to make them stand out even more. The interior detail was painted with dark colours to de-emphasize it. I dislike brightly coloured interiors, that standout on models, as you could never make out any details whilst watching the shows. On the last model I've
built I decided to add a working radar dish. I bought a
cheap toy electric motor with a gearbox assembly and
fitted a disc to the driveshaft creating a turntable that
rotates inside the Mobiles shell. The Radar has a central
tube extending out of the bottom and is simply inserted
into a hole in the roof and rides around on the
turntable. This means that the dish isn't attached to the
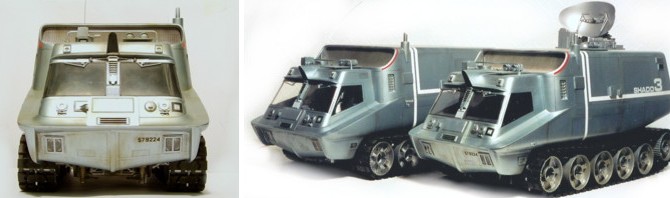
model and can be removed or added instantly. Chassis The chassis was fabricated from 4mm perspex sheeting. It was made to fit into a large gap in the bottom of the Mobile shell and is secured by screws that go up into a wooden beam inside the model. The wheels and tracks from the Mobile come from a 1960's childs toy - the 'Tiger Joe Tank'. Unfortunately when I built my first Mobiles in the 1990s I had never seen one of these toys, but Kevin had replicated a wheel on his lathe and made moulds for them and the tracks. Kevin made one mould of the smooth wheel, then added the ribs and moulded it again. As they were one piece moulds he was afraid that the rubber might flex a bit near the top and the final wheel castings would not be round on the sides facing the chassis. So this side was a larger diameter to compensate, meaning that each casting had to be mounted on a lathe and turned down slightly-as per the casting in the picture on the far right. Making the tracks was a
long job to do. 106 track sections had to be cast with a
few spares as well. The track links are very thin on the
toy and I was unsure of how to make them, as I didn't
want the model to be static I wanted them to 'work'. I
ended up using four thin strips of good quality black
card! I'm not a fan of what I call 'Blue Peter style'
modelling materials but the card worked fine and has
never snapped. Picture right; nowdays its a bit easier to get one of these on e-bay! The 'Tiger Joe' toy has extra wheels and the track has to be cut and shortened, but thats quite easy to do. You just have to be careful not to buy the version with all ribbed wheels - or the wheels with the extra detailing - or the small version!
Picture right; here I'm fixing the Tiger Joe tracks back together after cutting them shorter. The mouldings are mostly hollow but there are a couple of flat links that are different and these can be glued into the back. |
|
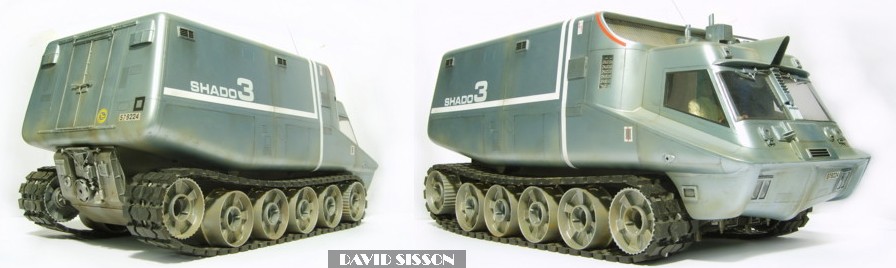
The steel axles also need to be shortened. The wheels are completely loose, with just small clips holding them onto the ends of the axles, while short lengths of larger diameter pipe keep them away from the chassis. Unfortunately, unless you've bought the toy with too many ribbed wheels, the standard toy only comes with two and you need four. One answer is to have another toy but the back of the wheel is hollow and can be seen on the rear wheels which I don't like. So my answer was to take a rubber mould of the front half of a ribbed wheel, make four casts and pair them off so that the back of the wheel has the same detail as the front. Weathering and dirt was applied using more enamel paint, airbrushed or smeared on with a rag - or with the lower part of the model flicked on with a toothbrush to indicate mud splatter. Finally graphite pencil, black powder paint and various coloured pastel chalks were applied - especially to the wheels. The Mobile is a light metallic blue in colour. I used a car paint called Peug/Talbot Cascade but it still appeared slightly too blue. So I painted the model silver then over sprayed it with the Cascade to tone down the colour. |
|
||
|
 |