![]()
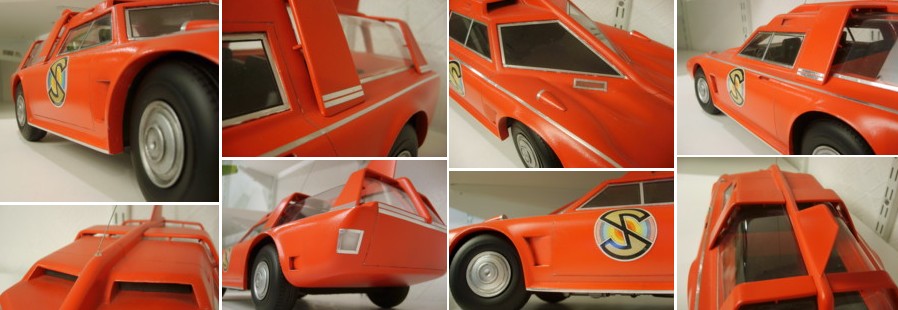
Building the Spectrum Patrol Car from Gerry Anderson's Captain Scarlet
|
|||
| Although
the special effects of previous series had been steadily
improving the amount of work done on Thunderbirds and the
effort going into the feature film, 'Thunderbirds Are
Go', meant that the SFX teams were highly skilled and on
a roll. Imaginative designs and quality models were
flowing out of the workshops and many of the shots were
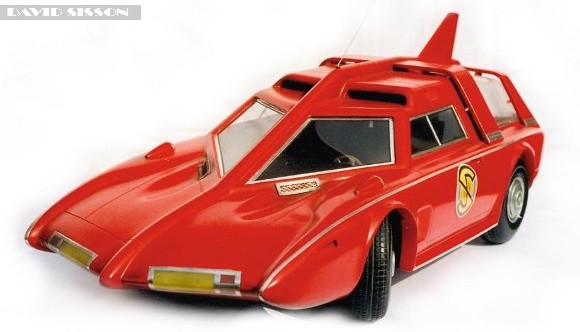
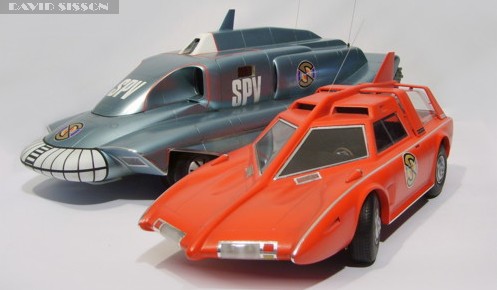
beginning to look completely convincing. My favourite vehicle was the SPV, which was designed by Derek Meddings, but the Captain Scarlet production allowed his assistant, Mike Trim, to come to the fore with a great many designs of his own, including the high speed Spectrum Saloon Car (SSC) also known as the Spectrum Patrol Car (SPC). |
|||
 |
|||
 |
The Build .By David Sisson As a starting point I
happened to have four 2 & 1/2 inch diameter wheels,
so I drew up a blueprint to scale with these resulting in
a model that would be around 17 inches long - just
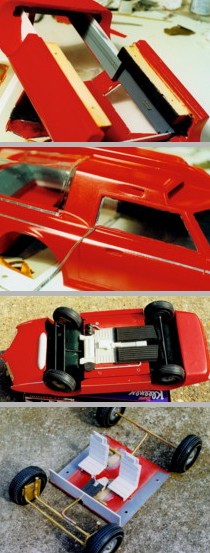
fractionally smaller than the original models. Then placing the two sides on my top plan blueprint, I cut out more lengths of Balsa and glued them in between to form the basic shape of the car. More Balsa was now added to help block out the full shape and provide the structure with more strength. A fair amount of this would be removed at a later stage but as it was balsa it could be hacked out with very little effort. At this stage most of the effort was spent on the sides as the back is plain and the front couldn't be made properly in wood.. With the model taking shape I had to decide how I was going to proceed. With most models I like to produce the final model in fibreglass, but as I thought I would only be making the one model I decided not to bother and just turn this master into the final item. (As usual though I've since had to make another one!) I could now continue and add the top section using MDF. I started by cutting out the central frame and a slot through the bonnet to securely locate it in position. The drivers cabin shell was now formed in thin sheets of MDF and the various wooden parts were coated in SP113 Epoxy Resin to give them a hard surface that would provide a better foundation for the car filler that I would be applying. A lot of work went into
shaping the bonnet. The central areas were sanded down
more than required so that I could build them back to the
correct shape in P38 filler. In the picture (lower right)
I'm making the initial shape of the two concave
indentations that run down from the windows. The bonnet area was now built back up to its desired level and shape, as was the central beam. The front window frames could also now be added as well as blending the MDF parts to the Balsa section with more filler. The wheel arches were now opened out fully and adjusted to their correct shape. To create the flare around the arch thin plasticard was superglued around the inside and filler smeared against the protruding edge and the bodywork. The plastic was then removed and the filler cut and sanded to the required shape. Now that the top was taking shape I could concentrate more on the bottom. Many of the Balsa supports that had been put into position at the start could now be removed giving me access to the interior. Two lengths of hardwood were glued to the inside edges and a Perspex chassis plate was screwed to them to create a detachable floor. More filler was applied to the upper roof vent areas and windows to give a nice flush finish to the parts. With the shape just about perfect I could add the assortment of vents and recesses that are featured on both sides of the car. Firstly the outlines of these were drawn in place then each area of the bodywork was cut out, again more so than required. Any loose Balsa was cleaned out of the holes and the wood sealed with resin. Then a small amount of P38 filler was placed in each hole and a piece of Plasticard wedged into it to define the required shape. As the filler begins to set it becomes jelly like, at which stage it's a good idea to cut away any excessive lumps of filler that are around the area. When it finally set the plastic could be pried loose and the area sanded down with wet & dry paper for a clean finish. The recessed door handles and the two small holes in the front wings were done the same way but with preshaped pieces of plastic. Next the head and tail lights were marked in position and the 'glass' for them was made by firstly warming pieces of transparent Plasticard over a heat gun until the middle areas were soft, then pulling this soft area around the specified parts of the car. Several spares were also made just in case I made a mistake, then the light clusters could be cut out of the bodywork and blocked out with Plasticard. The last detail was the tailfin, cut from Perspex and quickly shaped on my belt sander, it was glued in position with two internal metal pins anchoring it to the frame. The model was given one more partial coating of SP113 resin and sanded smooth, then several coatings of spray filler and again sanded smooth, before final painting began. The outside was sprayed using 'Mars Red' car paint while the interior was finished in enamel modellers paint. Detail on the inside was made from assorted kitparts and Plasticard. The large rear bubble was heat-pressed from thin transparent plasticard over a Balsa master, which had been coated in resin to stop the wood grain pattern from being transferred to the plastic. For those that have never done this it is a problematic technique and usually several attempts are required to get a decent pull. The trick is to make the master longer and higher than required so you can trim the final part down to get decent clean edges. The other windows were also cut out and glued in place using five minute epoxy. I didn't have to worry too much about getting blobs of glue on the edges of the windows as they are covered over in strips of adhesive metal foil. The doors obviously don't open but I wanted to indicate their presence with more than just a biro line. So during the painting stage I applied thin Flexline tapes to the bodywork to represent not only the doors but also the rear hatch and several other panel lines. These tapes were left in position for the final two spray coats and then removed to leave nice neat lines in the paintwork. With the bodywork almost finished I could now make the chassis. The wheels were paired off and attached to brass axles that connect to pivoting support arms fixed to the Perspex chassis plate. As I find vehicles with fixed forward facing wheels a little boring I decided to make the front wheels steerable. This resulted in a great deal of fiddling about to get them to fit inside the bodywork and not catch on anything as they turned. Finally two seats were fabricated out of Plasticard and the whole area painted matt black. The chassis plate was screwed into position and the bottom detailed with assorted model kit parts before also being painted black. Two pieces of foam were then placed under the pivoting arms to create the soft suspension. By moving the foam about the ride height can easily be adjusted. The transparent plastic light units were now cut out and glued into position with small non-working bulbs fixed in place just for show. As I test fitted these parts however I realised that they didn't look very good and not the same as those on the original model. My answer was to rub down the insides of the plastic, with fine wet and dry paper, to get a frosted appearance that looked much better. Also the front lights featured different coloured sections that I recreated by giving the insides a thin wash of enamel paint. |
|
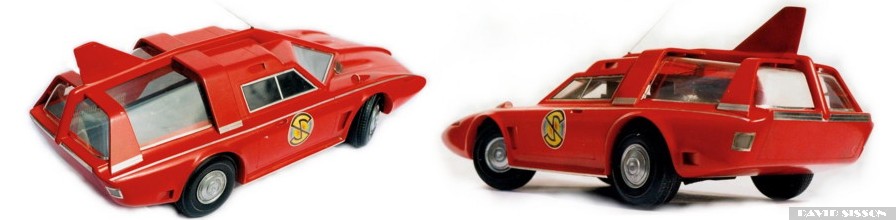
I now attempted to make the wheel hubs out of aluminium on my old lath. Several hours and several mangled pieces of metal later I decided to make them from plastic. Each hub was made by gluing together a varied collection of heat-pressed shallow domes and plastic rings. These were then sprayed with chrome paint - that just looks like silver paint to me but costs more! Final details included more strips of aluminium foil tape for the trim lines, a steel wire for the aerial and Spectrum markings made from photographs. The gold didn't print very well, so these areas were masked off and spray painted later. A little airbrushed weathering was applied, though not too much as I didn't want to muck up this rather beautiful model. In fact I think its possibly the nicest model I ever made - SIG. |
|
 |