![]()
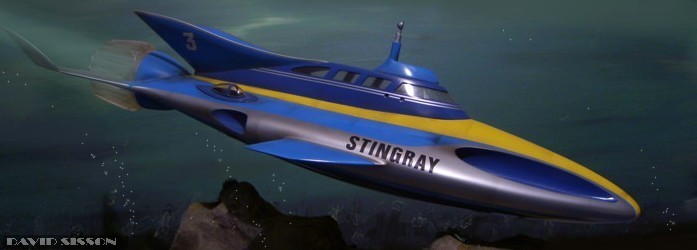
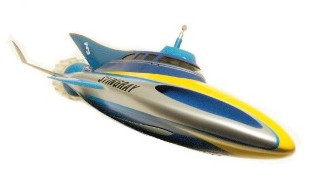
Building Stingray from Gerry Anderson's classic 1960s TV show
|
||
| Forty years on Stingray appears to have defied the passage of time as her unique lines have not dated her, she still looks pretty super today which proves what a brilliant imaginative design that it was. | ||
|
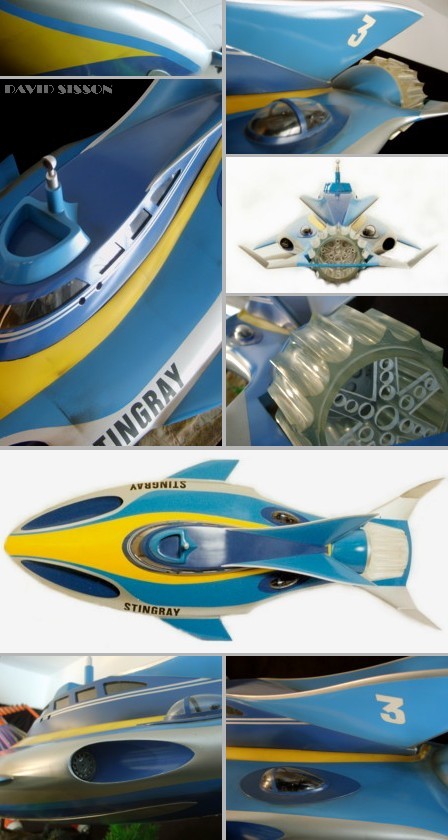
My plan was always to scratchbuild a model around two-feet long but had never got around to starting it, as I had Eagles and many other things to build. Then three of my model making friends announced that they had acquired a three-foot pattern and were in the process of making copies - and did I want one? Whilst I initially passed on it I did eventually end up doing a deal for a set of these parts as I decided that it would make a nice big display model. As a result this how-to article is on the short side as having a set of parts saved a lot of time......or so I thought before I ended up changing almost everything! The Build by David Sisson ......Also see Sci-Fi Fantasy Models Issue 14 Sept 1996 The main fibreglass hull came in two halves, top and bottom, that just needed tidying up and then joining together. It sounds simple but deciding how much to take off the sides and getting the parts to fit took a fair amount of time....and filler. Getting the parts to look right was very hard, but the problem was possibly caused by me trying to make it look like one version of Stingray when the original builder was copying a different model? |
As part of the mould making process the large torpedo tube openings could not be formed and so had been left as big open areas in the hull. The next job was therefore to apply filler around the edges to create the distinctive shapes. This had to be done in stages, slowly building up to get the desired look. The two smaller outlets towards the rear of the model also needed to be formed, by placing plastic tubes in the required position and packing the surrounding hull area with P38 filler. When the filler had set the tubes were twisted and pulled out and the excess filler cut and sanded away. Due to the nature of this build I didn't have a plan to work from and was constantly comparing the hull to the few photographs I had of the original studio models and of course, as usual, they had many differences. I took measurements and did many calculations but at the end of the day your eye can usually spot areas that are wrong - and there were wrong bits everywhere as far as I was concerned. Overall the model looked spot-on from the top it just didn't look right from the side, so out came my power drill. First of all the bottom of the model at the bow was completely drilled out and then reshaped in P38 motorcar filler. Then the top of the model, from a point just behind the torpedo tubes right back to the Ratemaster (about 14 inches) had to be drilled out, the areas were pushed down into the model and the surface above them again reshaped in filler. The big nose of the model was adjusted again and again and more filler was smeared over the bottom of the hull and repeatedly sanded to try and get it smooth and loose all the many distortions. The biggest problem was
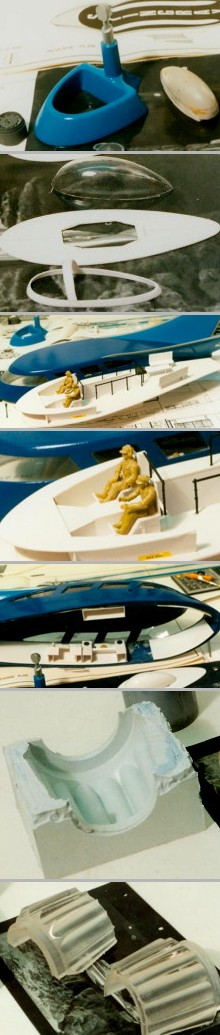
the crew cabin I had been given looked completely wrong.
I tried modifying it but at the end of the day I decided
that it was probably not worth the effort, so I
scratchbuilt one. Here I made a master by building up the
shape in 1/2-inch layers of Balsa wood. During the
process the windows are repeatedly drawn into position as
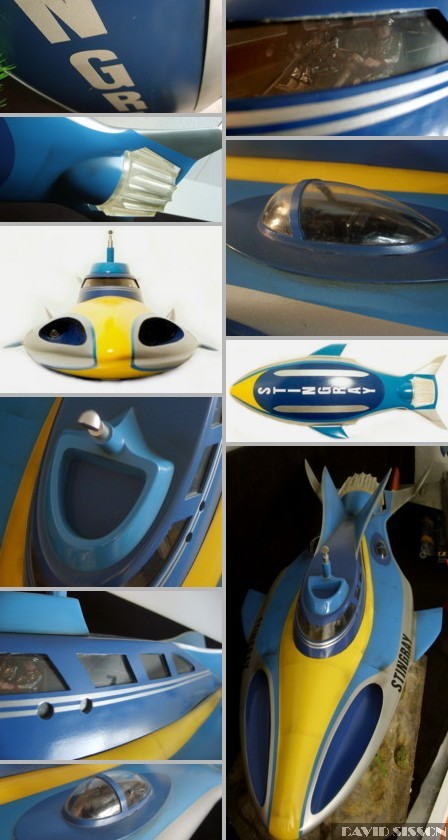
a guide to getting the contours correct. All the fins had been cut from Perspex sheet and roughly shaped. I altered them very slightly and then attached the pieces securely to the hull using long screws. To do this I always drill a smaller diameter hole in the Perspex and heat the screw over a blowtorch before inserting it into the plastic. Once cooled it is then locked into position. As the side fins were slightly too small I had to position them away from the hull and add the missing bits in filler. As there is a convenient paint line on the finished model I set the parts to match up to that line just in case the join became apparent at a later date. At this point I was beginning to think of this project as the P38 model from hell! Weeks and months passed and all I ever did was apply bits of filler and sand it down. Coat after coat of spray filler, more P38 and more sanding and still it wasn't smooth. As a result the model ended up on a shelf collecting dust more often than not, while I worked on something else. Finally it seemed to be done and I gave it a coat of silver paint to check out the contours. It appeared to be fine so I moved onto the next bits. The periscope had been
machined out of brass with the short conning tower cast
in resin. These parts were fixed and blended together
with Milliput epoxy putty. One thing that I've often noticed about other peoples Stingray models is that they never seem to put anything up the torpedo tubes, so you have two massive holes that go nowhere. On mine I decided to fit some kit-parts that represent the tube hatch covers and I also used two more kit-bits (car wheels that looked like rotors) for the mid-section outlets. A full cabin interior was constructed using Plasticard. Figures of Troy and Phones are just two 1/35th scale soldiers, cut up and reassembled on the seats. I was a bit lucky here as one seems to have Troy's hat on whilst the other has a pair of headphones. I had tried to make the fibreglass moulding of the cabin quite thin and uniform in thickness, as I had to glue a sheet of transparent plastic along the inside for the windows. I failed slightly and spent some time sanding the interior down to the right level. The cabin was painted before adding the 'glass' bits, then the interior instruments were built from Plasticard and kit-parts. All the interior details, including those in the Aquasprites, were painted in dark colours to prevent them from standing out too much, as you could never see this stuff on the television. The last major part to
be built was the oddly shaped transparent
Rotor/Ratemaster/Eddy Damper what-ever-it-is-called
thingy. Not much to tell here as I just had to cast it
using a pre-made rubber mould. Only half the thing had
been moulded so it was cast up in two halves with the
join line hopefully being obscured by the surrounding
tail fins. Almost finished it was time to paint the thing and I again used motorcar spray cans for the main job. Ford Silver Fox, Austin Rover Henley Blue, Lada Adriatic Blue and Peugeot/Talbot Hertz Yellow - and it was a right pain to do! It was at this stage that I found out just how smooth the hull was as I attempted to apply the masking tapes for the light blue colour. I had noticed on the original models slightly uneven paint lines and just thought it was sloppy work, but it's not really. Every time I applied a tape and thought it was perfect I would then look at it from a different angle and it would then quite clearly appear to be going up and down. The trick wasn't to get it perfectly straight from one angle but straight'ish from all angles - then duplicate it for the other side! Finally, the black Stingray markings were applied using Letraset decals and the even bigger lettering on the bottom was cut from white self-adhesive labels, which still look ok after ten years! The two large skids on the bottom were cut from 0.75mm Plasticard, spray-painted and superglued into position. The two thin silver lines on the cabin were also carefully masked and sprayed on as I thought coloured tapes might peel off on the front's curvy bit. Last of all, a circle of self-adhesive metal foil was placed on the end of the periscope to represent the glass part. |
|
|
 |