![]()
Scratchbuilding Fireball XL5 from Gerry Anderson's classic 60s TV show
|
|||
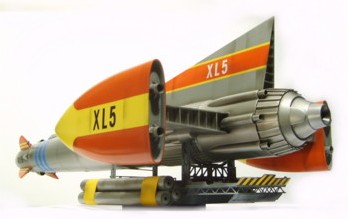
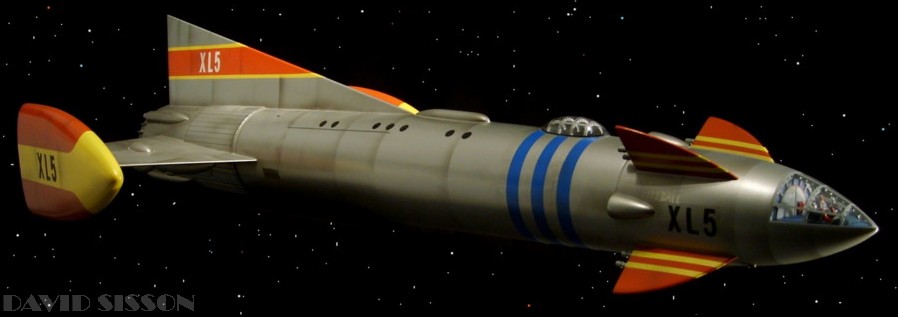
| Fireball XL5 is one ship in the fleet of the World Space Patrol and a classic design in the old '1950's' style of tubes, fins and rockets. As a model its not too difficult to make although I've only ever tried to build the craft once before and gave up, put off slightly by the cylindrical hull that begins to taper half way down its length. | |||
 |
|||
|
As a Gerry Anderson replica model maker it was a craft that I had to make for my collection, and as I do a fair amount of public displays then it also needed to be built to a big size. So I settled on building a 40" model and planned to order some plastic tube from EMA model supplies, but the cost and the fact that this tubing was thin-walled and perhaps not strong enough made me change my mind. After a bit of searching I came across some strong thick-walled 'toilet waste pipe' in my local Wickes DIY store. This pipe cut well, bonded to the glues I was using and even better it was only £4.99 - bargain. The only minor point was that it was slightly bigger than I wanted, meaning that I had to redraw the blueprint and have a 43" model. The Build by David
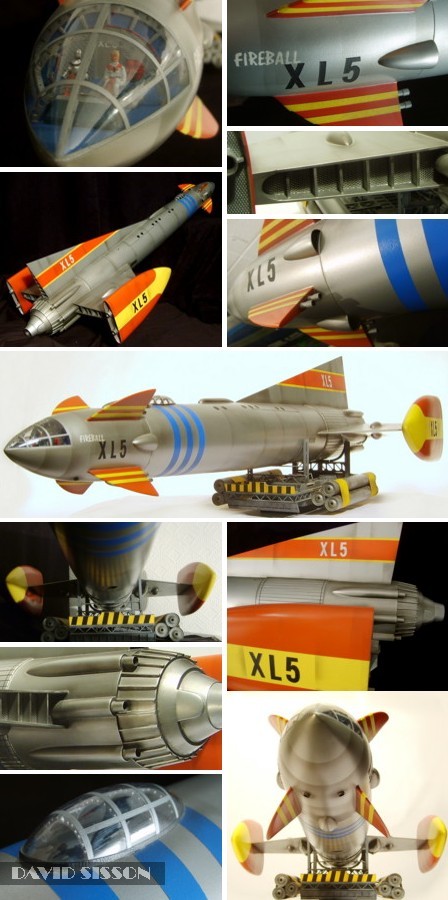
Sisson The first part to be built was that tricky hull shape. I started by cutting the waste pipe to the correct size then cutting a smaller diameter tube to the full length of the hull. Two 2mm Plasticard discs with holes in the centre (like giant washers) slipped over this smaller tube and supported it centrally inside the bigger pipe.. |
|
Another Plasticard washer was glued to the end of this innertube indicating the required diameter of the hull at this point. It was now just a case of filling in the angled space between it and the waste pipe centre hull. This was achieved by blocking out most of the shape in waste bits of plastic, then skimming over with P38 car filler..This only took a few days to do, building up the shape in layers and repeatedly placing a steel rule along the sides to check for deformaties. The area was coated in spray filler paint and rubbed down with wet & dry paper, wrapped around a sheet of curved Plasticard to keep it straight, which quickly identified any problem areas that needed fixing.. At this stage I decided to use this pattern as my finished model, as I had no intention of building any duplicates. I was however worried that the join between the plastic centre hull and the front filler section might begin to reveal itself in later years, and crack the paint finish, as the two different materials reacted to temperature changes. To combat this the thick straight-cut plastic tube edge was chamfered on the inner edge so that the filler doesn't just butt up against it, but actually blends in creating a stronger connection. The rear section and
wings were next. Here the base of the main engine has
been cast from a P38/resin mixture. The mould for this
was actually a kit part from a Revill Gemini Capsule that
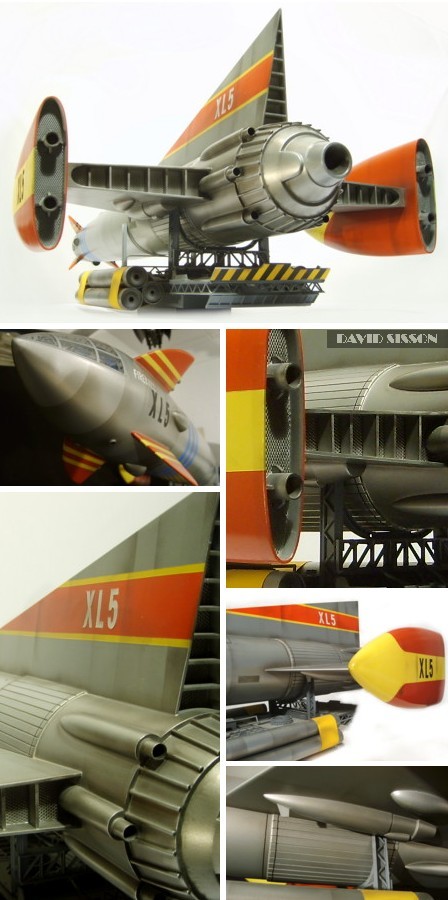
by chance was the correct shape. The main engine was cast out of a P38 filler/resin mixture from a plaster mould taken from a master made from Plasticard, filler and modified kit parts. The exhaust tube was then hollowed out and a cone shaped insert fitted. The six small rocket engines that surround the main engine were now made. Here I used a kit part (half a missile body) and added a contoured tip. This shape was vac-formed in thin Plasticard a couple of times. While the part was still in the plastic moulding I used a biro to draw around it's edge leaving a mark on the plastic. Then it was removed, the plastic waxed and then P38 filler was smeared inside. Ten minutes later I pulled the casting out complete with a copy of the biro line around it, indicating the level I had to sand it down to At the same time I vac-formed the blisters for the wings and the clear canopy for the secondary pilots cabin. Again I always look through my missile and bomb kits for parts to use on these items - the Airfix 1/24th scale Harrier often comes in handy. The tail fin was now cut
from thin Perspex sheeting. I was more than a bit worried
about the tail being knocked off at some future point,
and had to attach it to the hull with more than a few
drops of glue. Here small bits of plastic were added to
the inner edges as anchor points to give the glue
something to hang on to. Likewise the glue wouldn't be
very strong just applied to a smooth hull so I added a
line of half buried screws into the plastic surface. The various vac-formed parts were then glued to the wings and the corrugated band added to the hull. This was done in two layers, the outer being a series of plastic strips assembled over an initial plain piece of plastic which helped build the thickness whilst setting the position. The three vertical boosters were drilled out and conical model kit engine bells glued into the holes.. The rear section could now be detailed. Brass tubes created the small rocket exhausts and brass rod the piping. Metal mesh was inserted into the open tail fin and wings then plasticard ribs added. I decided to make the outboard stabilizers as very thin fibreglass castings. The outline of the part was cut from MDF, then a layer a balsa wood added which was sanded and cut to shape. Only half the stabilizer had to be formed, then four plaster casts were made and the fibreglass copies produced. These were trimmed to the correct level, paired off and superglued together, with a bit more resin run down the inside to really lock them together. Any small holes were filled with putty, then the two parts were coated in spray filler and sanded smooth. Unfortunately after painting I decided that although they matched my blueprint, and measurements from photographs, they looked slightly too thin. So I threw them away, altered the master and started the process again. One thing I've learned over the years is that any minor mistake, or something you're not happy with, will always irritate and end up making you dislike the model - it has to be changed even if other people can't see it. The front section,
Fireball Junior, was also made in fibreglass from a
master formed out of Plasticard and car filler. Two
outlines were cut out of plastic and assembled together
with a series of ribs to create the basic shape that was
then skimmed over with filler and sanded to shape. As the
master is almost finished the edges of the plastic have
to be cut out of the surface and filled - or they cause
the surface finish to be uneven. A Plaster cast was then
taken of this and the final part cast up in fibreglass. |
|
The stabilizer fins were fashioned in MDF. Protruding screws were embedded in the base of each and these were placed into holes in the side of the hull, and then covered in car filler to lock them in place. More filler blended the MDF pieces to the hull and corrected any imperfections in the wood. Again the parts are coated in spray filler and sanded down to remove any surface imperfections. The pilots were made by modifying model kit figures. The canopy was then very carefully attached using Araldite two-part clear adhesive. Masking tape was applied to the canopy during the process to prevent any glue-fingerprints accidentally spoiling the finish. Finally the four side fairings were vac-formed in 0.75mm plasticard and the small thrusters made from brass tubes. Throughout construction I had been wondering how to attach Fireball Junior to the main hull, the model was too heavy for magnets and any threaded rods would require access points. In the end I decided that as the model of Junior was only just over 7" long I really didn't want it to be a separate item so glued it into place - if I want a stand alone model of it then it makes more sense to build a bigger version. |
 |
|
The XL5 markings were simply cut fom self-adhesive paper labels and spray painted. The odd 'Fireball' lettering on the Junior was done with normal Letraset markings, then the edges were gently scraped away to create the rough flame effect. Cellulose motor car spray paints were used for the basic colours with enamel model paints for the small details and weathering. Rather odd point on these early models is the fact that some weathering streaks forwards as well as backwards. |
 |